Overview
The Email settings feature lets you use your AI agent as an email support channel.You get a unique agent email in the format
agent@subdomain.chatbase-mail.com that you can:
- Send emails and automatically receive AI-crafted replies.
- Connect to your own domains and mailboxes, so customers see messages coming from your email addresses instead of the default
chatbase-mail.comdomain.
You can add up to 3 custom domains, and up to 20 email addresses per domain.
Attachments are supported, allowing your agent to process them and respond based on their content. For more information, please refer to this section.
How it works
- Agent email: When you create an AI agent, we generate an email like
agent@subdomain.chatbase-mail.com. - Inbound messages: Customers send an email to:
- Your agent email, or
- One of your own addresses (for example,
support@yourdomain.com) that automatically forwards to the agent email.
- AI response: Your agent processes the email and generates a reply.
- From address:
- If you don’t connect a domain, replies are sent from your
agent@subdomain.chatbase-mail.com. - If you do connect and authenticate a domain, we can send email on your behalf (for example,
support@yourdomain.com), once DNS is correctly configured.
- If you don’t connect a domain, replies are sent from your
To send emails from your own domain, you must (1) configure automatic forwarding from at least one mailbox on that domain to your agent email, and (2) add the DNS records we provide to your DNS provider.
Prerequisites
- Access to the Chatbase dashboard and the AI agent whose email settings you want to configure.
- Admin access to your email provider to set up forwarding rules.
- Admin access to your DNS provider (domain registrar or DNS host) to add TXT, MX, and/or CNAME records.
Accessing Email settings
1
Open your AI agent settings
Go to the Dashboard, select your AI agent, and open the Settings page.Then open the Email settings section. If you haven’t enabled email settings before, you’ll need to enable the email channel first.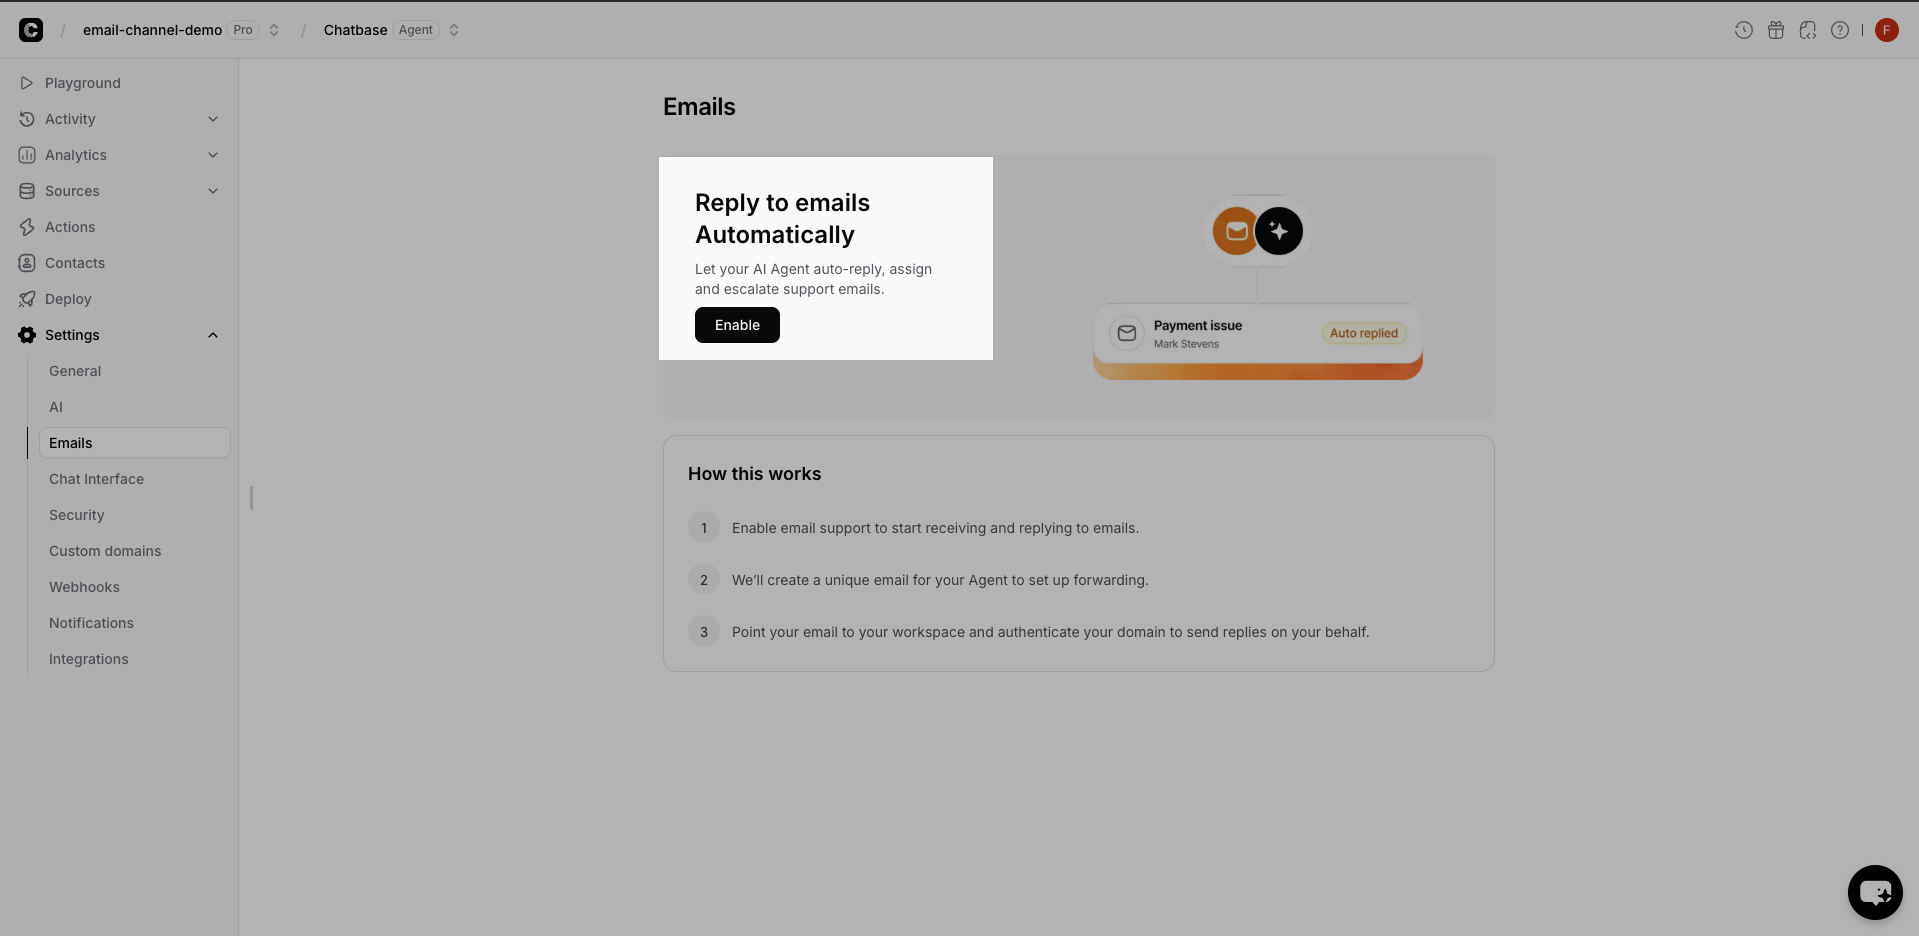
2
Locate your agent email
You’ll see your automatically generated agent email, for example: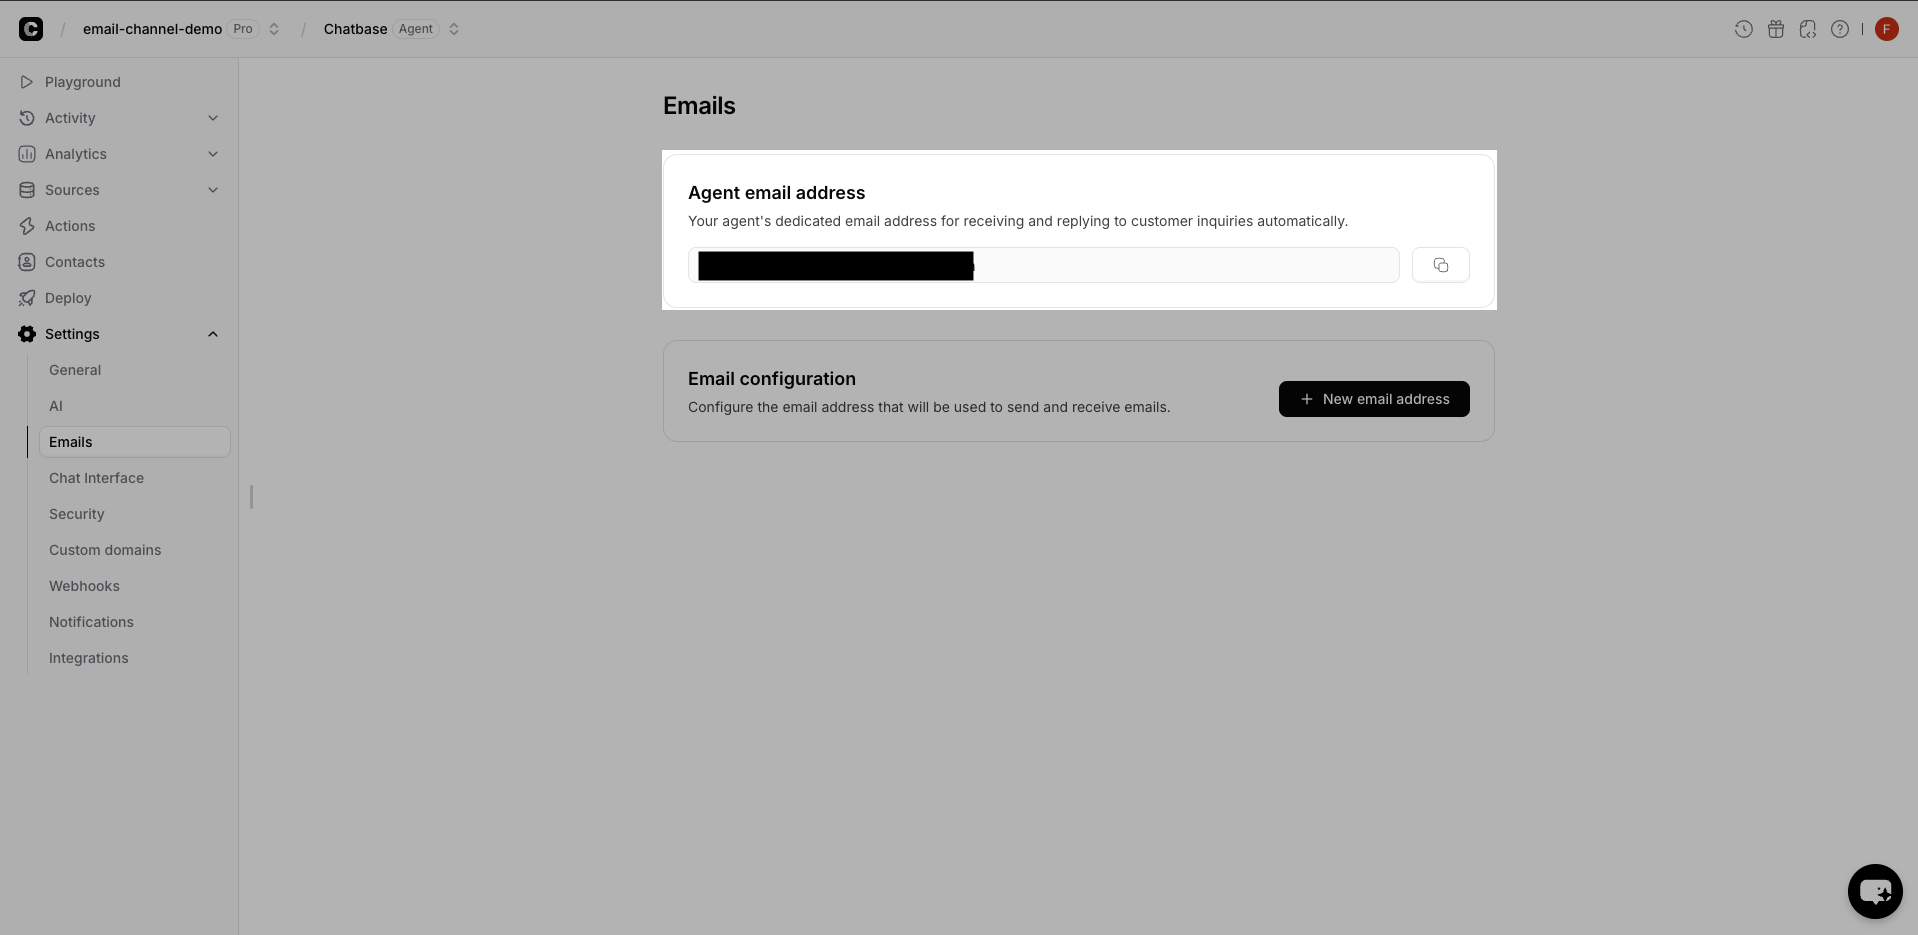
agent@subdomain.chatbase-mail.comUsing the agent email directly
You can start using the feature immediately by sending an email to your agent email:- Send an email from any mailbox to
agent@subdomain.chatbase-mail.com. - The AI agent processes the email content.
- You receive a reply from the same
agent@subdomain.chatbase-mail.comaddress.
To enable AI agent replies, you must first enable the email channel. Learn more about enabling the email channel.
If you receive a reply from your agent email, your basic email channel is working correctly.
support@yourdomain.com or billing@yourdomain.com), continue with the next sections.
Step 1 – Add an email address
To configure a custom email address for your AI agent, start by adding the email address you want to use.1
Click New email address
In Email settings, click the New email address button to start the setup process.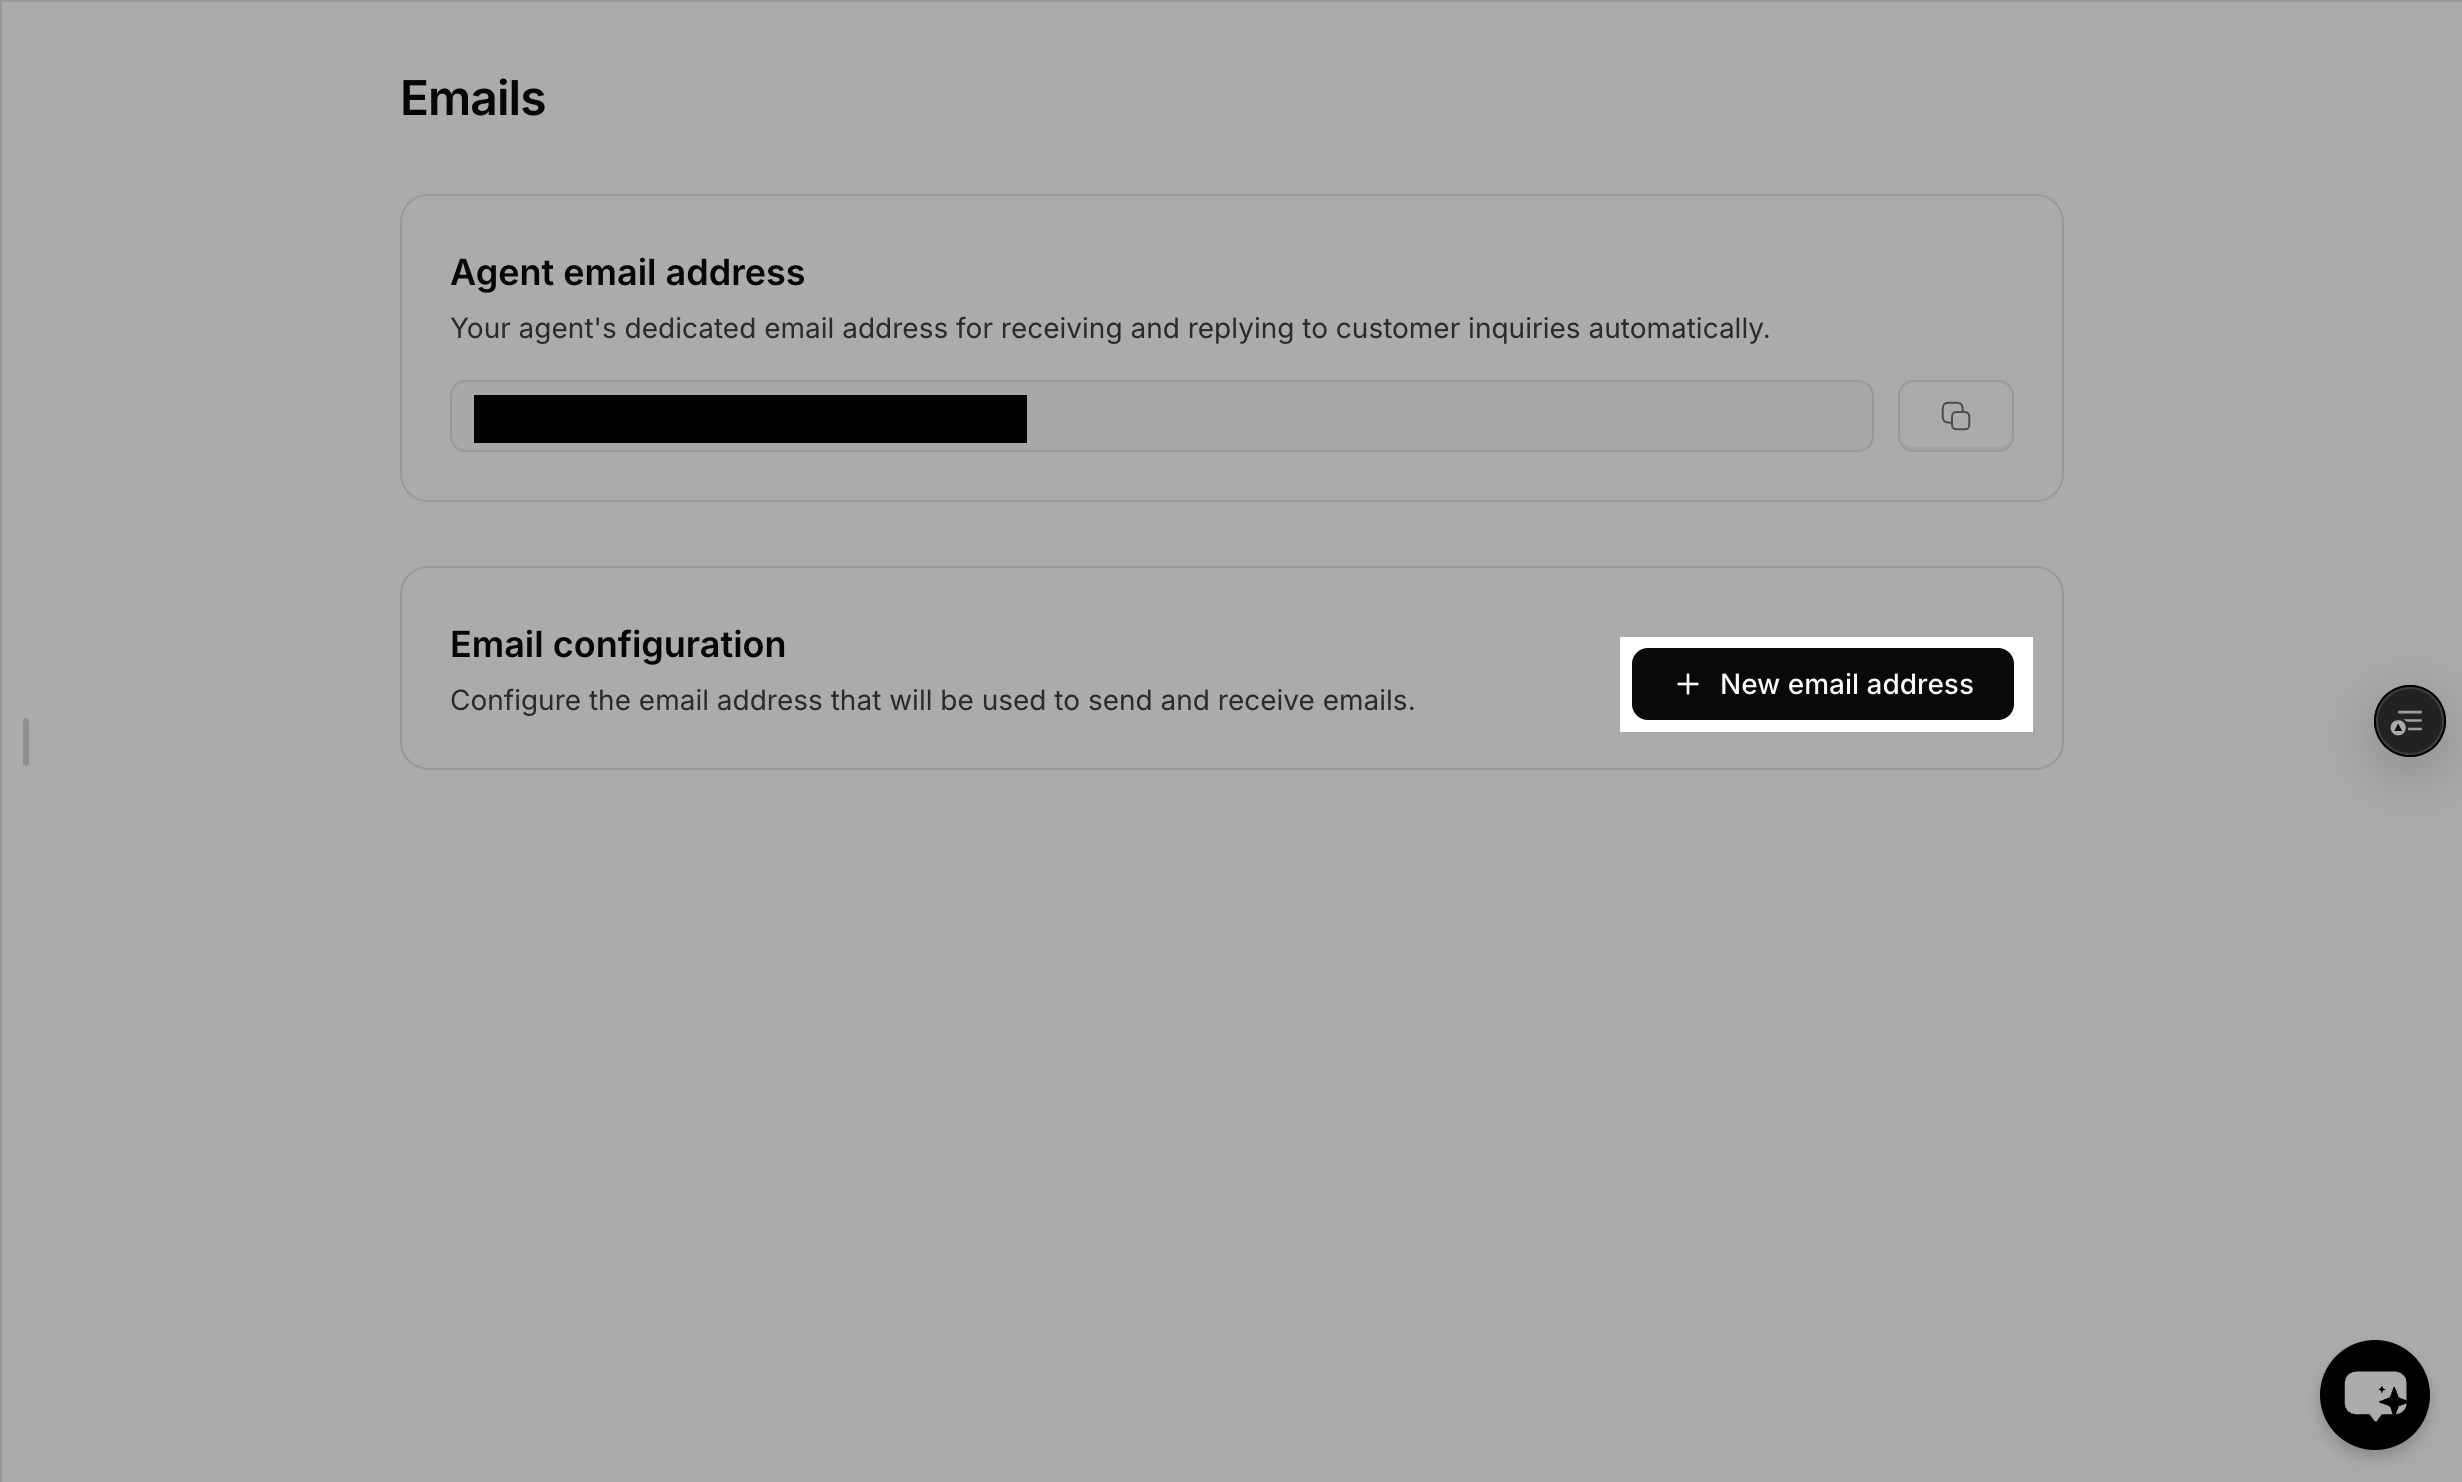
2
Enter your email address
Enter the email address you want to use (for example, 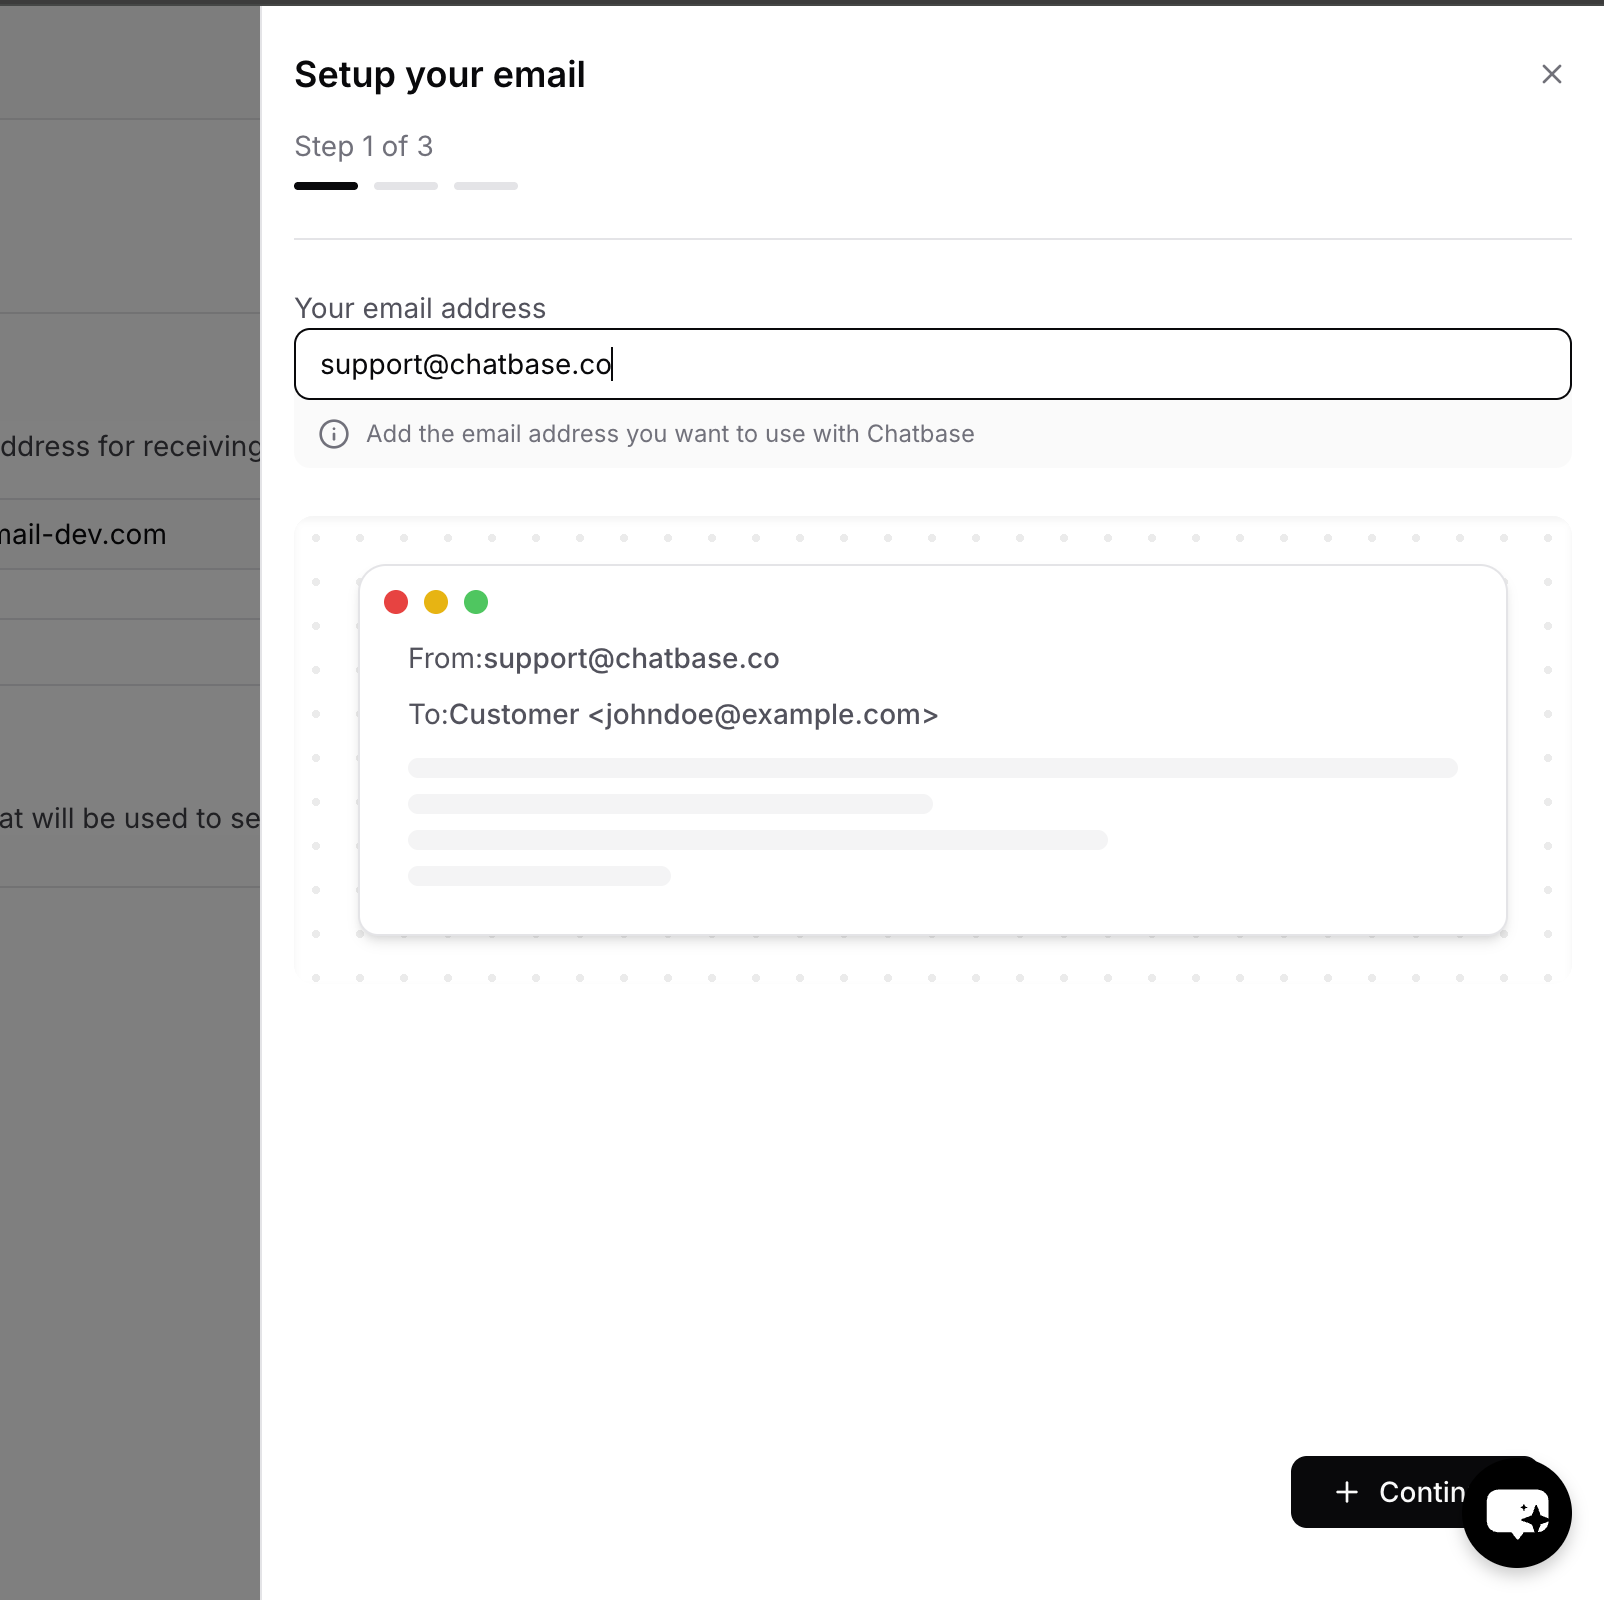
support@yourdomain.com).The domain will be automatically extracted from the email address. You can add up to 3 domains per workspace and up to 20 email addresses per domain.
3
Continue to forwarding setup
Click Continue to proceed to the email forwarding configuration step.
Step 2 – Configure email forwarding
Next, configure automatic forwarding in your email provider so that emails sent to your support addresses are delivered to your agent email.Forwarding flow
- A customer emails
support@yourdomain.com. - Your email provider forwards that message automatically to
agent@subdomain.chatbase-mail.com. - The AI agent processes the email and generates a reply.
- The response is sent back via email from your authenticated domain.
Set up forwarding in your email provider
The exact steps depend on your provider, but the general pattern is:- Sign in to your email provider’s admin or mailbox settings.
- Open the Forwarding, Rules, or Filters section.
- Create a rule that forwards incoming messages from the mailbox (for example,
support@yourdomain.com) to your agent email (agent@subdomain.chatbase-mail.com). - If your email provider requires verification before allowing the forwarding rule:
- The provider will send a verification email to your agent email.
- You can find and approve the verification email in your agent’s chatlogs.
- Click Verify automatic forwarding in the Email settings drawer.
- If everything is set up correctly, you’ll be taken to the authenticate domain step (Step 3).
Provider-specific forwarding guides
For detailed instructions on setting up email forwarding, refer to your email provider’s documentation. Here are links to official guides for popular email providers:Gmail and Google Workspace
- Gmail (personal inbox forwarding): Set up email forwarding in Gmail
Configure email forwarding in Google Workspace (Admin Console)
This approach is recommended for Google Workspace because it doesn’t have rate limits and doesn’t require creating a mailbox for the address you’re forwarding.You need Google Workspace administrator access to complete these steps.
1
Open the Google Workspace Admin Console
Sign in to the Admin Console using an admin account.
2
Go to Gmail routing settings
Navigate to Apps → Google Workspace → Gmail.Find Default routing, then click Configure or add another rule to create a new routing rule.
3
Create a routing rule for your support address
When adding the setting: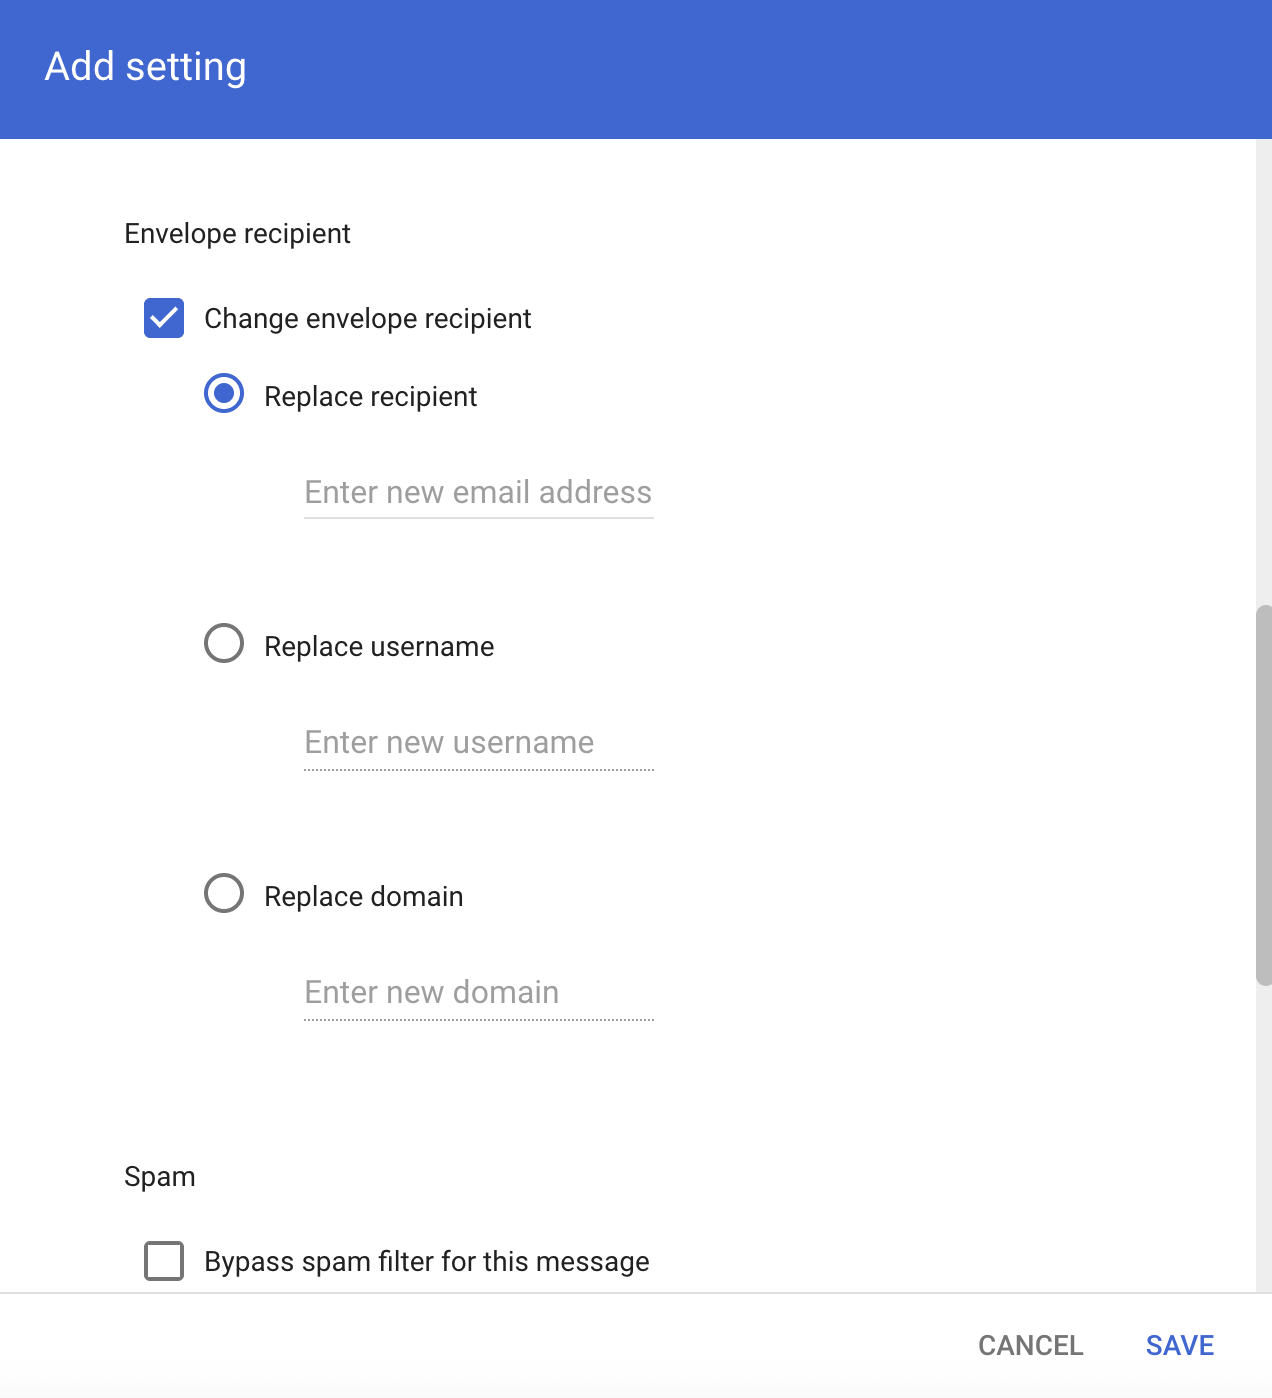
-
Set Envelope Recipient to the email address you want customers to use (for example,
support@yourdomain.com). - Under Envelope Recipient, select Change Envelope Recipient.
-
In Replace Recipient, enter your Chatbase agent email (for example,
agent@subdomain.chatbase-mail.com).
4
Save the rule and enable it for recognized + unrecognized addresses
Before saving, confirm the option is set to:Perform this action on non-recognized and recognized addresses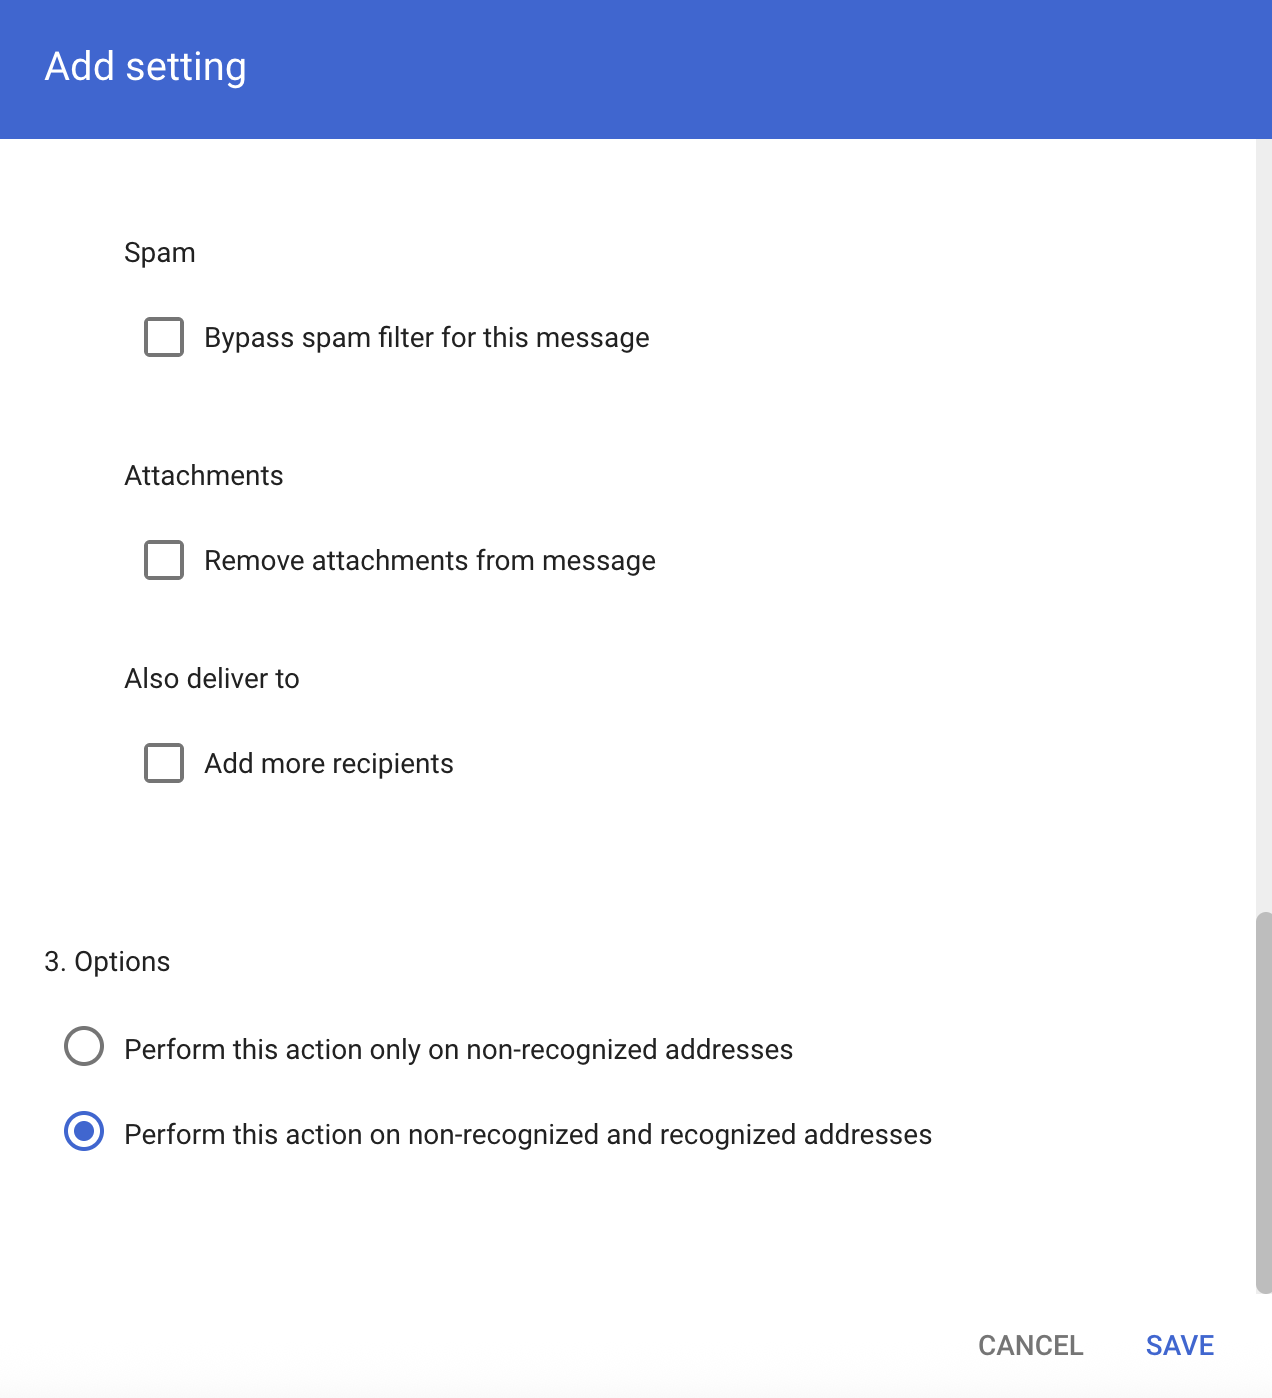
5
Verify forwarding in Chatbase
Return to Email settings in Chatbase and click Verify automatic forwarding.
Changes can take up to 24 hours to propagate, although they often take effect sooner.
Microsoft
- Outlook (all versions): Turn on automatic forwarding in Outlook — follow this guide to set up forwarding to your Chatbase agent email. This works for Outlook.com, New Outlook, Classic Outlook, and Outlook on the web.
Allow external forwarding in Microsoft 365 (required for work accounts)
After setting up forwarding in Outlook, Microsoft 365 will block the forwarded emails from leaving your organization by default. Your Microsoft 365 administrator must allow external forwarding for the emails to reach Chatbase. Without this step, forwarding appears configured in Outlook but emails are silently blocked and Chatbase verification will fail. For more details, see Microsoft’s documentation on external email forwarding.You need Microsoft 365 administrator access to complete these steps. If you are not the admin, share these instructions with your IT team.
1
Allow external forwarding in the outbound spam policy
Sign in to the Microsoft Defender portal.Navigate to Email & Collaboration → Policies & Rules → Threat policies → Anti-spam (under Policies).Select the outbound spam filter policy (the default policy or a custom policy that applies to your users).Click Edit protection settings.Find the Automatic forwarding rules setting and change it from “Automatic - System-controlled” (or “Off - Forwarding is disabled”) to “On - Forwarding is enabled”.Save your changes.
If you don’t want to enable forwarding for the entire organization, you can create a custom outbound spam policy that only applies to specific users or groups, and enable forwarding only in that policy. Alternatively, you can use Remote domains in the Exchange admin center to allow forwarding only to the Chatbase mail domain.
2
Verify forwarding in Chatbase
Return to Email settings in Chatbase and click Verify automatic forwarding.
Other email providers
- Yahoo Mail: Automatically forward emails in Yahoo Mail
- ProtonMail: Set up email forwarding in ProtonMail
Step 3 – Authenticate your domain with DNS
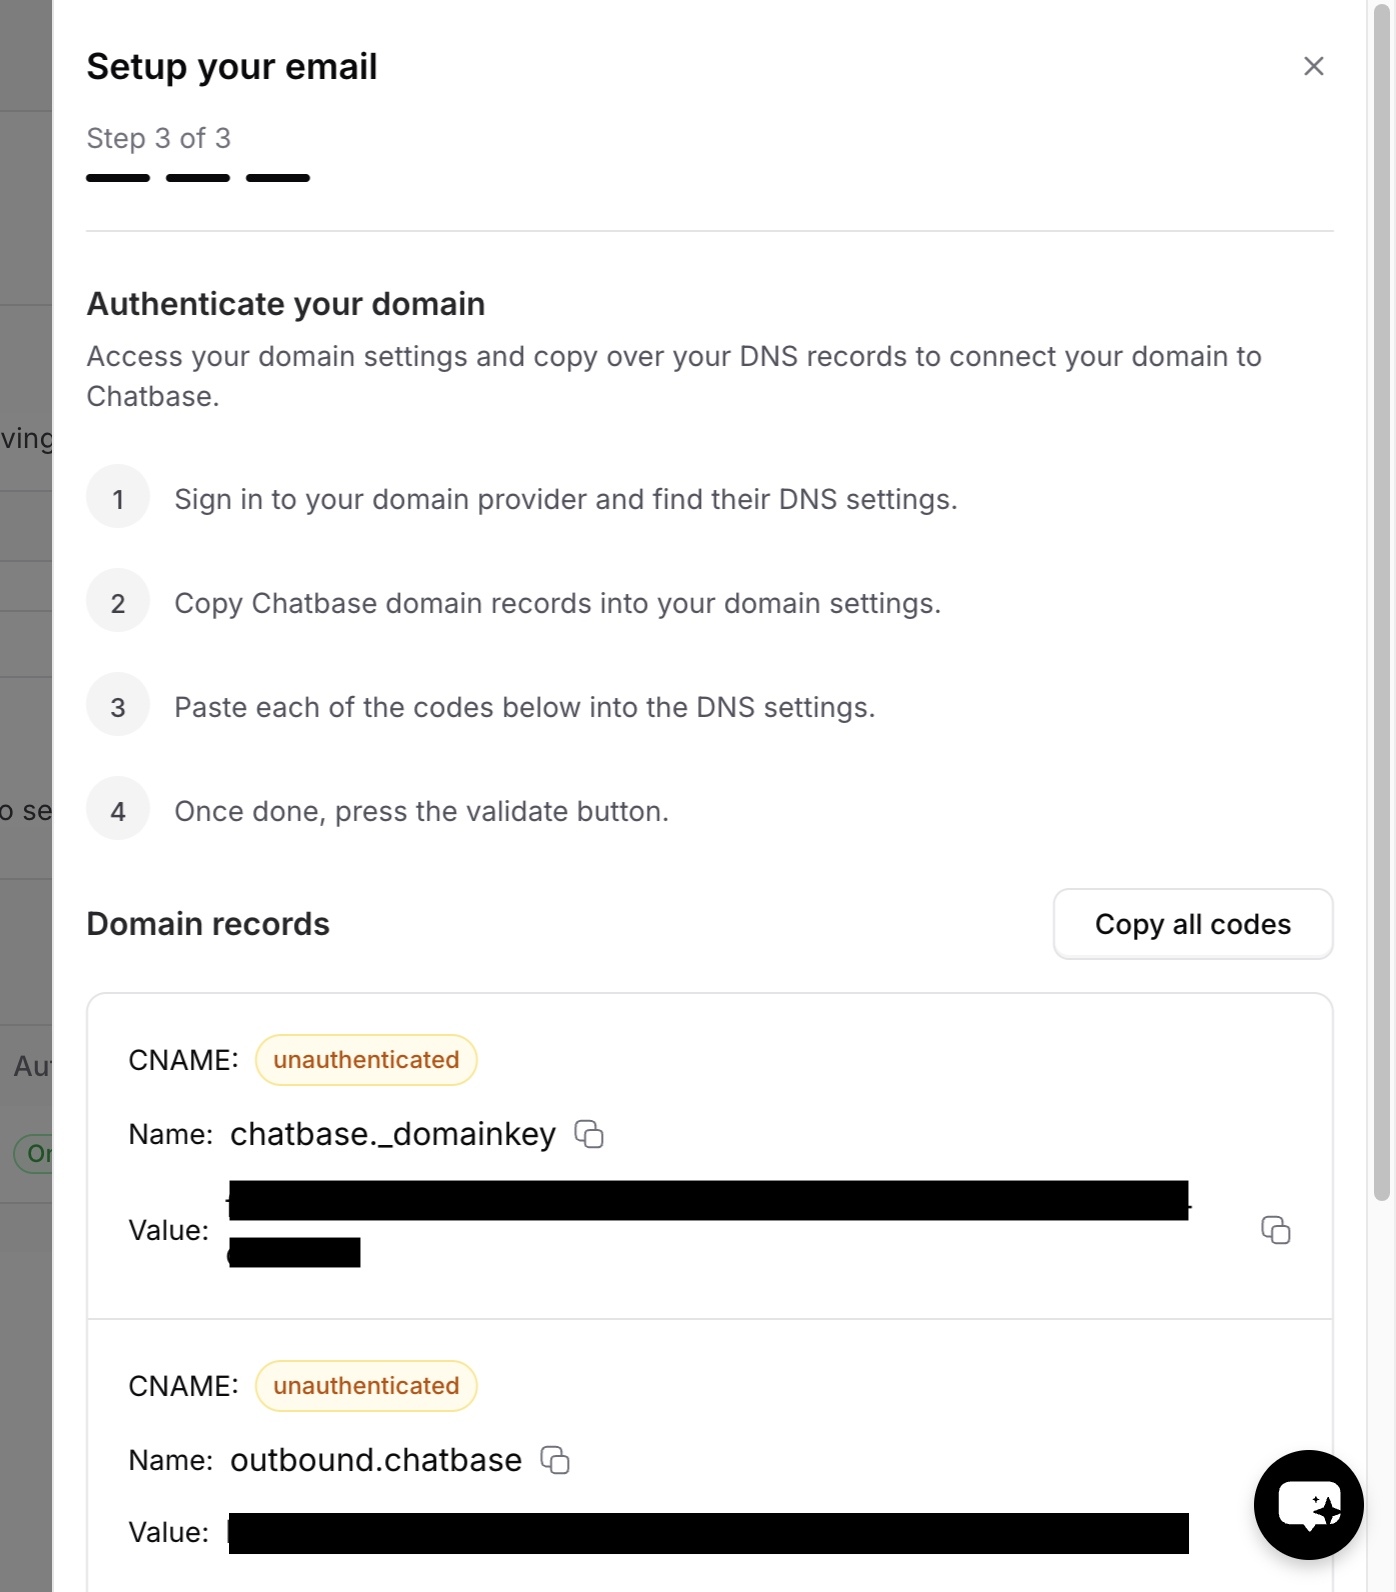
Once we detect automatic forwarding from at least one email address on the domain, you’ll be able to proceed to DNS authentication. This step allows Chatbase to send emails on your behalf from your custom domain.View your DNS records
After forwarding is verified, you’ll see the DNS records you need to add. In the Email settings drawer, you’ll see:- Record type (CNAME or TXT)
- Name (the DNS record name)
- Value (the DNS record value)
Add records at your DNS provider
Sign in to the DNS provider that manages your domain (this might be your registrar or a DNS host like Cloudflare), then add the records we provided.The DNS records you need to add include:
- CNAME record for DKIM authentication (e.g.,
chatbase._domainkey) - CNAME record for SPF authentication (e.g.,
outbound.chatbase) - TXT record for DMARC policy (e.g.,
_dmarc)
Provider-specific DNS guides
For detailed instructions on DNS authentication, here are links to official guides for popular DNS and domain providers:Domain registrars
- GoDaddy: Add a TXT or CNAME record
- Namecheap: How to manage DNS records
DNS hosting providers
- Cloudflare: Manage DNS records
- Amazon Route 53: Working with DNS records
- Google Cloud DNS: Managing DNS records
- Azure DNS: Manage DNS records
Verify your domain
After you add the DNS records at your DNS provider:- Return to the Email settings drawer in Chatbase.
- Click Validate to check if the DNS records are correctly configured.
- DKIM: Shows as “authenticated” when the CNAME record is found
- SPF: Shows as “authenticated” when the CNAME record is found
- DMARC: Shows as “authenticated” when the TXT record is found
Once all DNS records are verified, this email can be configured to be used by the AI agent to respond to emails. Replies will be sent from your domain addresses (for example,
support@yourdomain.com) instead of the default agent@subdomain.chatbase-mail.com address. Learn more about configuring the email channel.Adding and managing email addresses
After you’ve added your first email address and completed the setup process, you can add additional email addresses to the same domain or add emails from different domains.Adding more email addresses
To add additional email addresses:- Click New email address in the Email settings page.
- Enter the new email address (for example,
sales@yourdomain.com). - Follow the same 3-step process:
- Enter the email address
- Configure email forwarding
- Authenticate the domain (if not already done)
You can add up to 20 email addresses per domain. If you’re adding an email from a domain that’s already authenticated, you’ll only need to complete steps 1 and 2 (email address and forwarding).
Testing your setup
Once forwarding and DNS are configured:- Send an email from an external address (for example, your personal Gmail) to one of your connected addresses (for example,
support@yourdomain.com). - Confirm that:
- The conversation appears under your AI agent’s conversations.
- The reply is sent back to your external address.
- The From address matches your expectations:
- If the domain is not verified: it will come from
agent@subdomain.chatbase-mail.com. - If the domain is verified: it will come from your configured address on that domain.
- If the domain is not verified: it will come from
Troubleshooting
Email forwarding issues
I don’t see emails in my agent conversations- Confirm that forwarding is enabled and points to the correct agent email (
agent@subdomain.chatbase-mail.com). - Check for filters or rules that might be archiving or deleting messages before they are forwarded.
- Verify that your email provider has sent and you’ve approved any required verification emails.
- Check your agent email’s conversation history for any verification emails that need approval.
DNS authentication issues
Domain verification fails- Ensure there are no typos in the CNAME or TXT record values—copy them exactly as shown.
- Verify that you added records on the correct DNS zone:
- For
yourdomain.com, add records at the root level - For
subdomain.yourdomain.com, add records for the subdomain
- For
- Wait for DNS propagation—some providers can take up to 48 hours to update DNS records globally.
- Each record is verified independently. Check each one:
- DKIM (CNAME): Verify the name includes
chatbase._domainkey - SPF (CNAME): Verify the name includes
outbound.chatbase - DMARC (TXT): Verify the name includes
_dmarc
- DKIM (CNAME): Verify the name includes
- Ensure the record values match exactly what’s shown in Email settings.
Microsoft 365 forwarding blocked
Verification keeps failing and no emails reach Chatbase- Microsoft 365 blocks automatic external forwarding by default. Your admin must enable it in the outbound spam filter policy. See Allow external forwarding in Microsoft 365 above.
- Check if the sender is receiving a non-delivery report (NDR) with the error:
5.7.520 Access denied, Your organization does not allow external forwarding. This confirms external forwarding is blocked. - If using a custom outbound spam policy, ensure the policy applies to the correct users or groups.
General issues
I can’t add more domains- You can add up to 3 domains per workspace. Remove an existing domain if you need to add a new one.
- You can add up to 20 email addresses per domain. Consider using a different domain if you need more addresses.
- Ensure all DNS records (DKIM, SPF, DMARC) are properly configured and verified.
- Check your domain’s reputation using tools like MXToolbox.