> ## Documentation Index
> Fetch the complete documentation index at: https://chatbase.co/docs/llms.txt
> Use this file to discover all available pages before exploring further.
# Shopify Actions
> Help customers browse products, track orders, manage their cart, and update their account through your AI agent
## Overview
Shopify Actions enable your AI agent to provide comprehensive e-commerce support directly within the chat interface. These actions give your agent access to your store's product catalog, order information, and customer data, allowing it to assist shoppers throughout their entire journey.
You can test Shopify actions and see how they will look using the Chatbase Shopify demo store [here](https://chatbase-demo-store.myshopify.com/)
**Prerequisite:** Before using Shopify Actions, you must [set up the Shopify integration](/user-guides/integrations/shopify) with your Chatbase account.
## Available Shopify Actions
### 1. **Retrieve and display products**
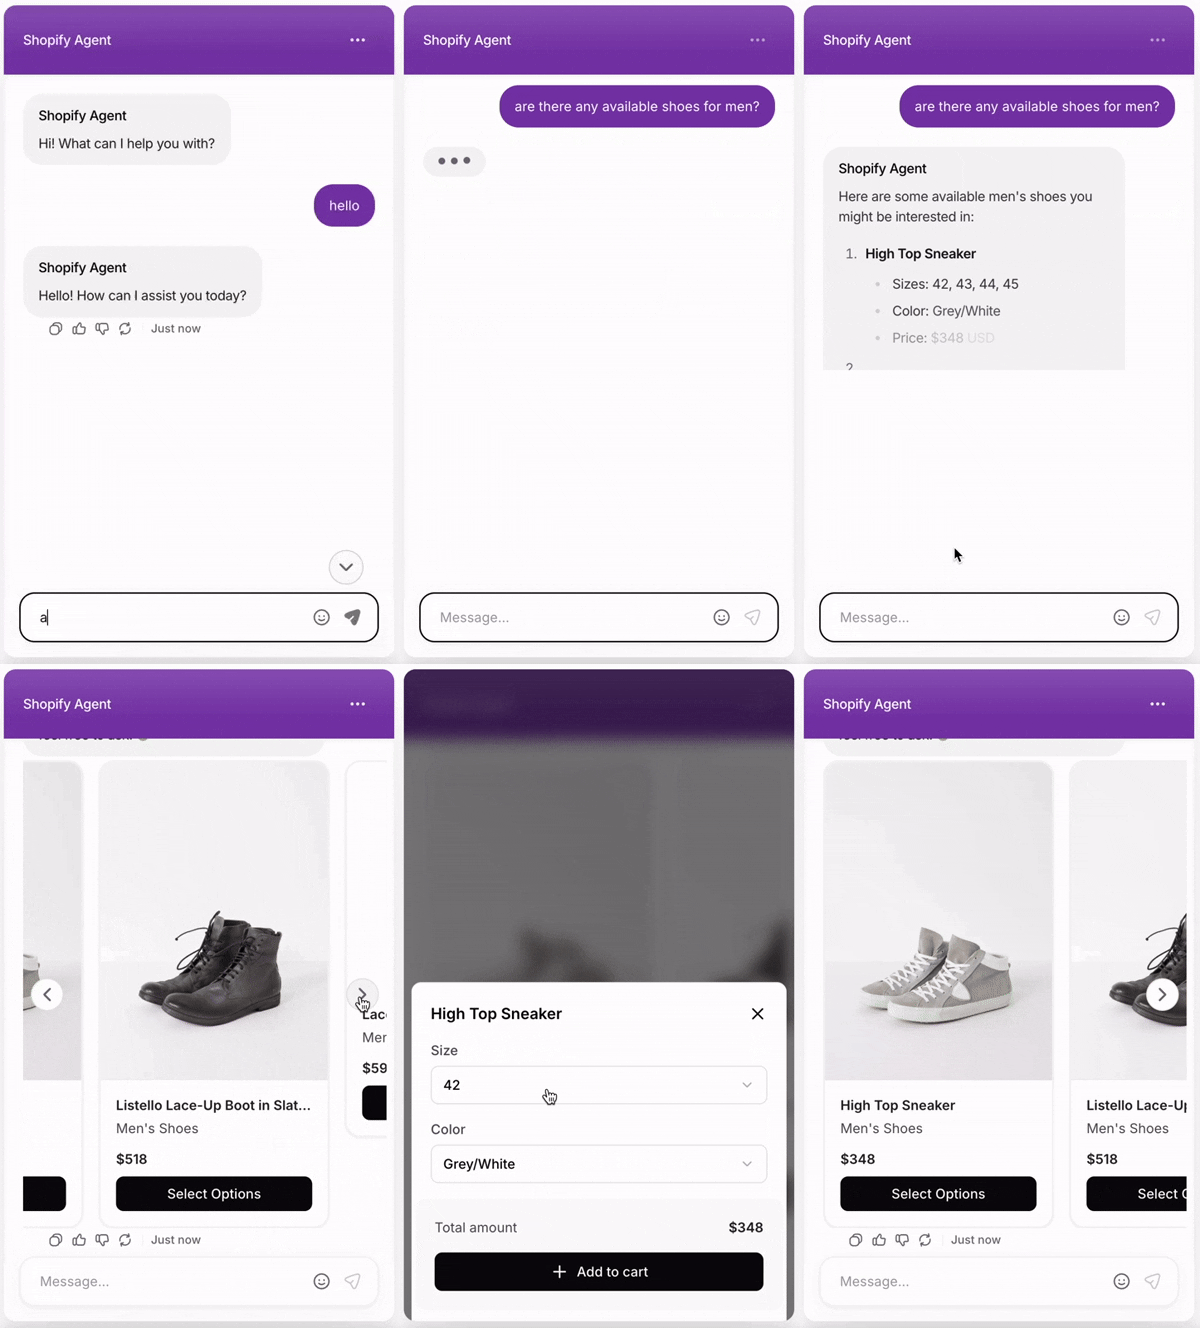
Search and display products from your Shopify catalog. Customers can browse by category, search for specific items, and add products directly to their cart.
Helping customers discover products, answering questions about inventory, comparing items, and facilitating add-to-cart actions.
**Common Use Cases:**
* "Show me red dresses under \$50"
* "What laptops do you have in stock?"
**Note:** Adding products to the cart only works when the app is embedded in your Shopify store. It will not work in the Playground.
#### Cart Update Events
By default, when a customer adds a product to their cart through the chat widget, your theme's cart icon doesn't update until the page is reloaded. The item is added, but the cart count still shows 0 until the customer refreshes.
To avoid that, Chatbase dispatches custom DOM events whenever the cart changes, so your theme can update the cart UI in real time. With a listener in place, adding one product makes the cart count show 1 right away, with no refresh.
The following events are fired:
```js theme={null}
document.dispatchEvent(new CustomEvent('cart:updated', { detail: { newCart } }));
document.dispatchEvent(new CustomEvent('cart-update', { detail: { newCart } }));
document.dispatchEvent(new CustomEvent('cart:update', { detail: { newCart } }));
```
You can listen to any of these events in your theme's JavaScript to keep the cart UI **in sync**:
```js theme={null}
document.addEventListener('cart:updated', (event) => {
const cart = event.detail.newCart;
// Update your theme's cart count, e.g.:
document.querySelector('.cart-count').textContent = cart.item_count;
});
```
Multiple event names are dispatched to ensure compatibility across different Shopify themes. You only need to listen to one of them.
#### How Product Sync Works
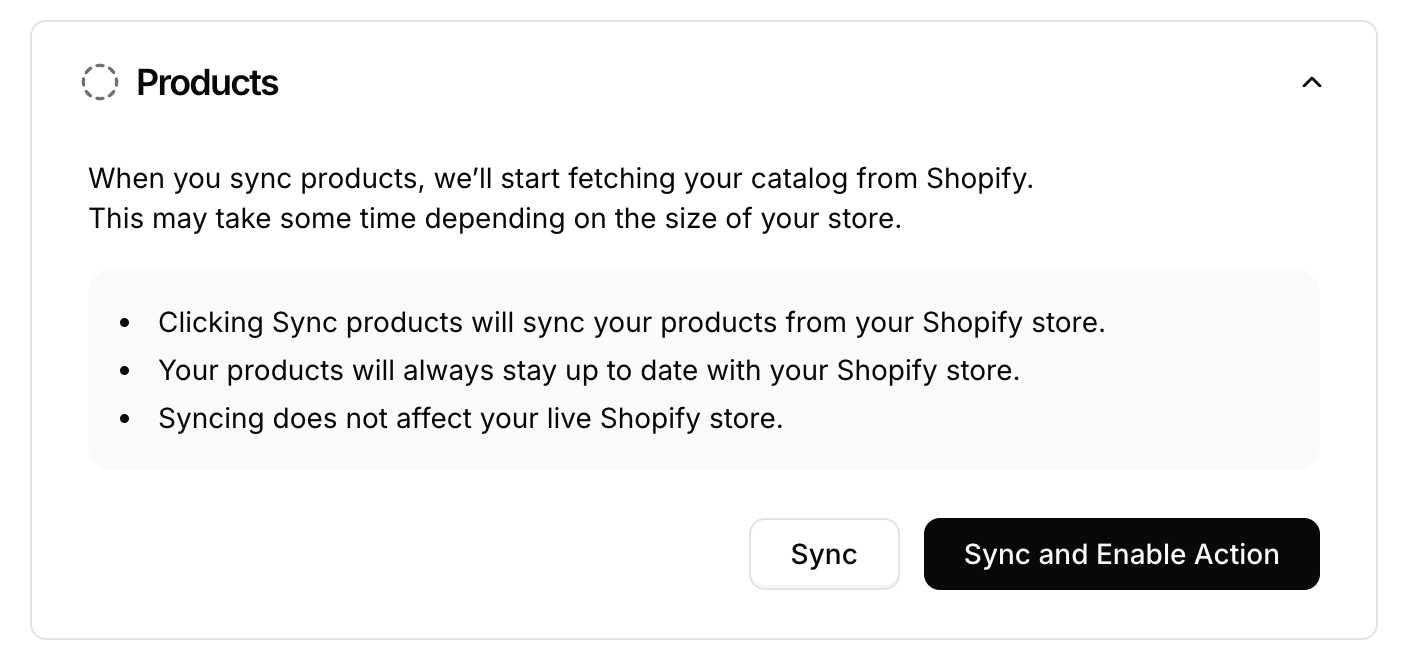
To sync your catalog, expand the **Products** accordion and click **Sync** or **Sync and Enable Action**. Chatbase will then retrieve all products from your Shopify store. After the initial import, Chatbase automatically listens for changes—whenever a product is added, updated, or deleted in your store, the data syncs in real time. This ensures your agent always has access to up-to-date product information. When you delete the action, Chatbase automatically removes its stored product data and stops syncing future updates.
Note that once this action is in use, your agent already has your product data through the sync, so you can exclude product pages from your website training source.
#### Setup Instructions
Go to your [Chatbase dashboard](https://www.chatbase.co/dashboard/) and select the agent connected to your Shopify store. Click **Actions** at the top of the page.
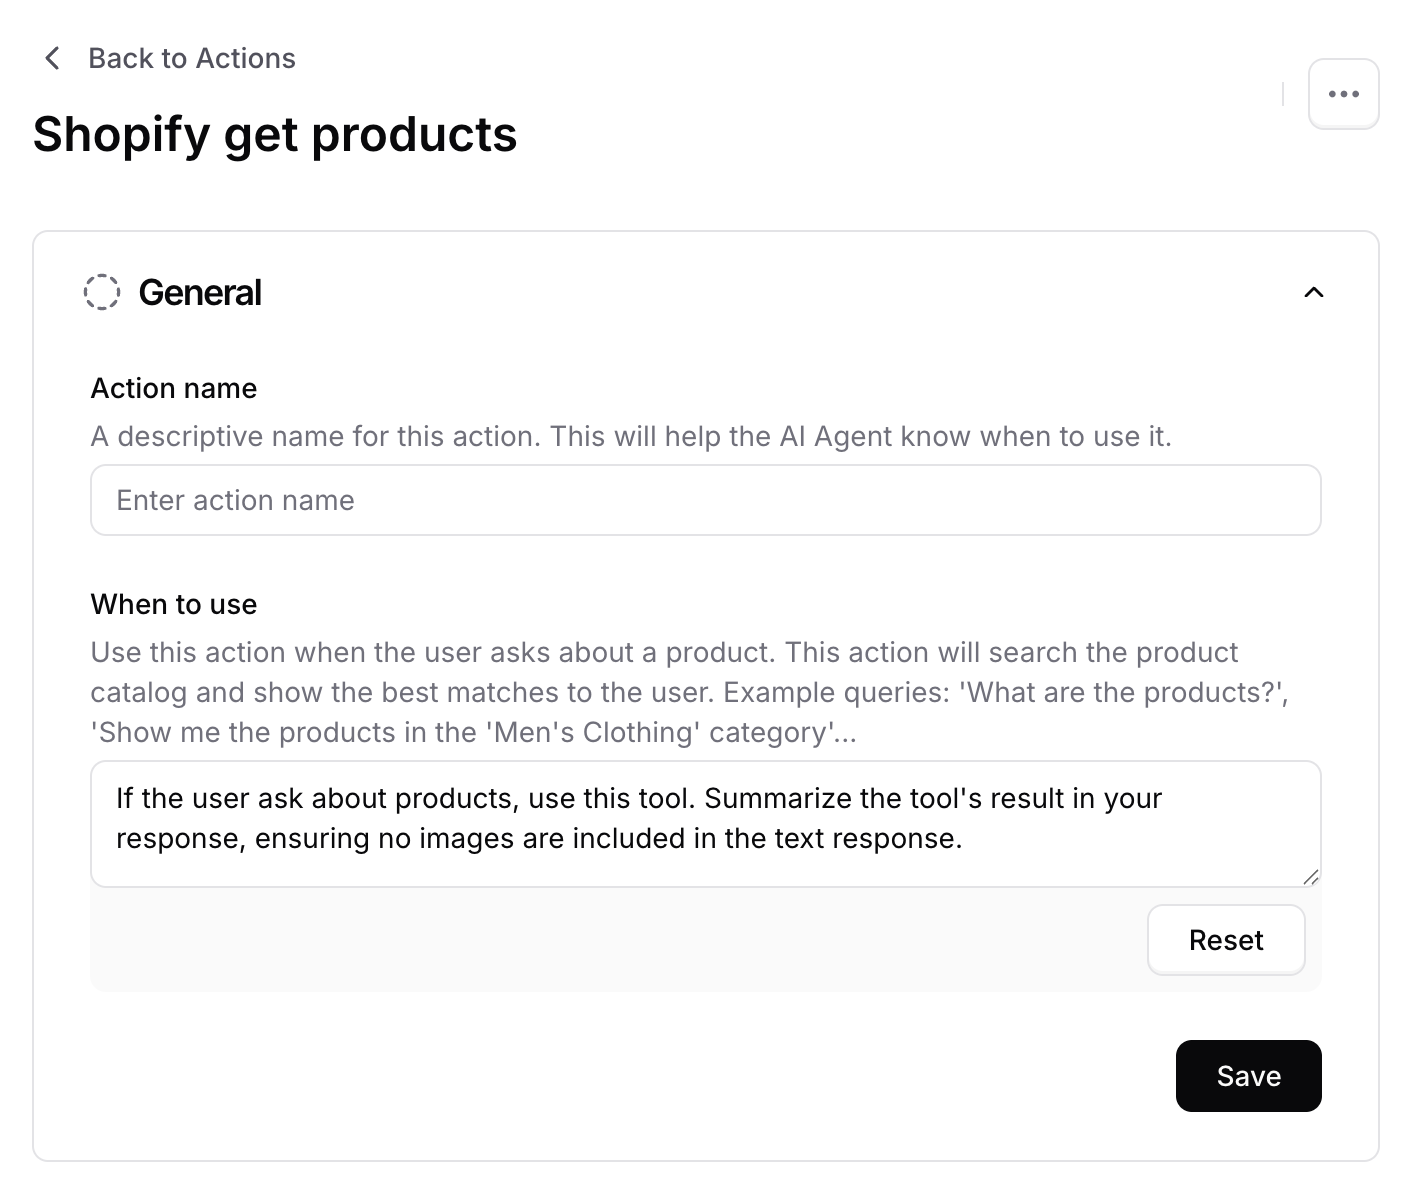
Click **Create Action** and choose **Shopify Retrieve and display products.**
Both fields come pre-filled with working defaults. Leave them as-is unless you need to make a specific change.
**Action Name:** Get\_Products.
\*\*When to use: \*\*If the user asks about products, use this tool. Summarize the tool's result in your response, ensuring no images are included within the text response.
 Expand the **Products** accordion and click **Sync** to import your catalog, or click **Sync and Enable Action** to sync and enable the action in one step. The initial sync may take a few minutes depending on your catalog size.
 If you clicked **Sync** in the previous step, click **Save** and ensure the action is toggled to **Enabled**.
Test the action by asking your agent product-related questions to verify it returns accurate results.
If you clicked **Sync** in the previous step, click **Save** and ensure the action is toggled to **Enabled**.
Test the action by asking your agent product-related questions to verify it returns accurate results.
 ***
### 2. **Retrieve and display orders**
Retrieve order information for customers. Customers can check order status, view their purchase history, and get details about specific orders using various filters.
Answering order status inquiries, providing tracking information, displaying purchase history, and helping customers find specific order details.
**Common Use Cases:**
* "Where is my order?"
* "Show me my recent orders"
* "What's the status of order #1234?"
* "When will my package arrive?"
**Order status:** The widget pulls order status directly from Shopify, so it reflects the latest information Shopify has available on the order status page. Shipped orders appear as "**On its way**". To display delivery confirmation, ensure your store uses a trackable carrier (USPS, UPS, FedEx, etc.) or a third-party app that provides delivery updates to Shopify.
#### Setup Instructions
Go to your [Chatbase dashboard](https://www.chatbase.co/dashboard/) and select the agent connected to your Shopify store. Click **Actions** at the top of the page.
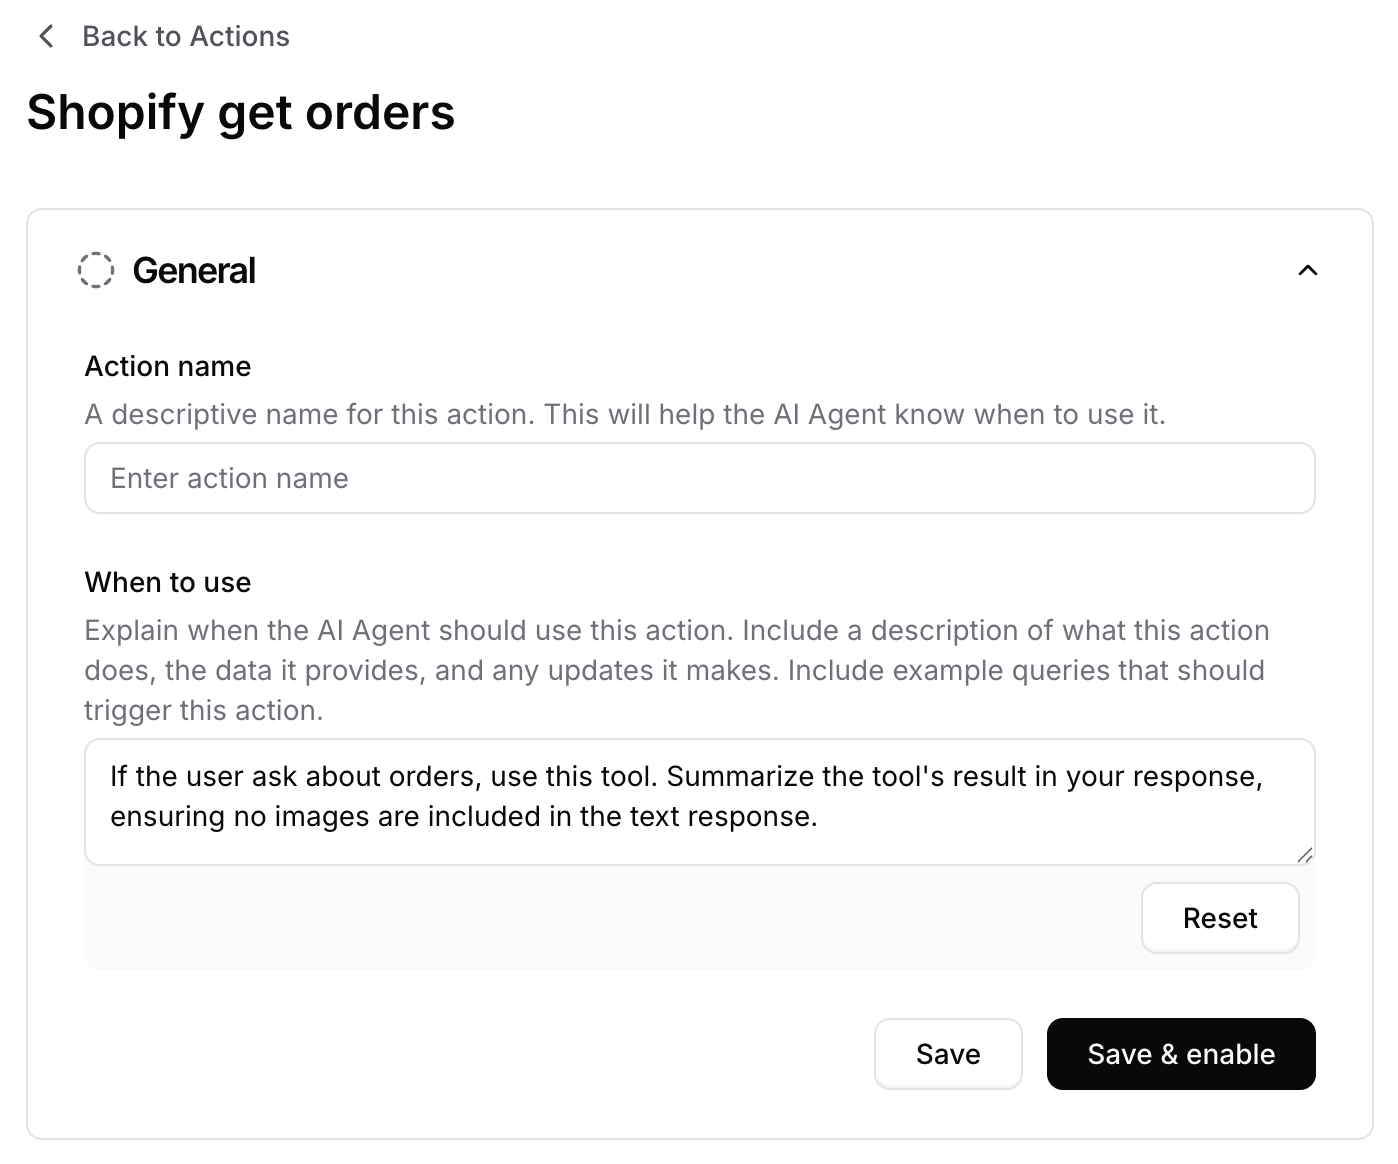
Click **Create Action** and choose **Shopify Retrieve and display orders**.
Both fields come pre-filled with working defaults. Leave them as-is unless you need to make a specific change.
**Action Name:** Get\_Orders.
**When to use:** If the user ask about orders, use this tool. Summarize the tool's result in your response, ensuring no images are included within the text response.
***
### 2. **Retrieve and display orders**
Retrieve order information for customers. Customers can check order status, view their purchase history, and get details about specific orders using various filters.
Answering order status inquiries, providing tracking information, displaying purchase history, and helping customers find specific order details.
**Common Use Cases:**
* "Where is my order?"
* "Show me my recent orders"
* "What's the status of order #1234?"
* "When will my package arrive?"
**Order status:** The widget pulls order status directly from Shopify, so it reflects the latest information Shopify has available on the order status page. Shipped orders appear as "**On its way**". To display delivery confirmation, ensure your store uses a trackable carrier (USPS, UPS, FedEx, etc.) or a third-party app that provides delivery updates to Shopify.
#### Setup Instructions
Go to your [Chatbase dashboard](https://www.chatbase.co/dashboard/) and select the agent connected to your Shopify store. Click **Actions** at the top of the page.
Click **Create Action** and choose **Shopify Retrieve and display orders**.
Both fields come pre-filled with working defaults. Leave them as-is unless you need to make a specific change.
**Action Name:** Get\_Orders.
**When to use:** If the user ask about orders, use this tool. Summarize the tool's result in your response, ensuring no images are included within the text response.
 Click **Save** and ensure the action is toggled to **Enabled**.
Test the action by asking your agent about order status to verify it retrieves the correct information.
Click **Save** and ensure the action is toggled to **Enabled**.
Test the action by asking your agent about order status to verify it retrieves the correct information.
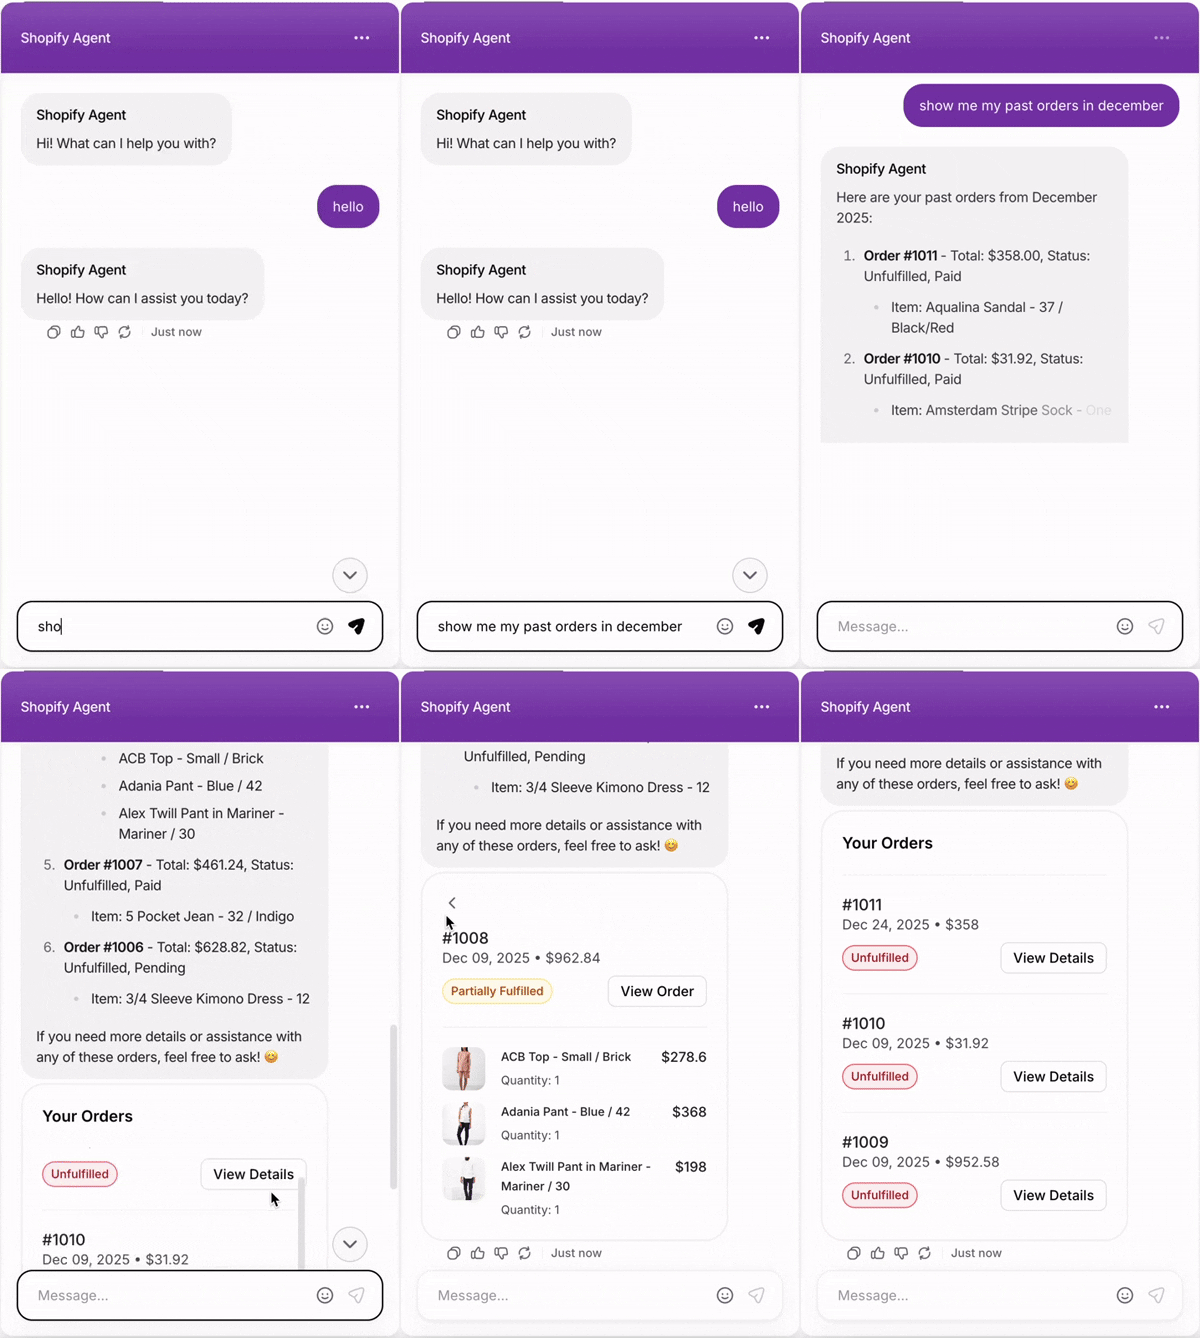 **This action cannot be tested in the Action Preview on the dashboard, as it requires the user to be authenticated in order to work properly.**
**Guest customers can look up orders using either:**
* Checkout email + order number
* Phone number + order number
**For authenticated customers, order lookup is automatic**, no email address, phone number, or order number is required. Orders are retrieved directly from the signed-in account.
***
### 3. Get Cart
Display the current contents of a customer's shopping cart, including items, quantities, prices, and totals.
Showing customers what's in their cart, displaying cart totals, and helping customers review items before checkout.
**Common Use Cases:**
* "What's in my cart?"
* "Show me my cart total"
* "How many items are in my cart?"
* "What did I add to my cart?"
**Note:** Retrieving the cart only works when the app is embedded in your Shopify store. It will not work in the Playground.
#### Setup Instructions
Go to your [Chatbase dashboard](https://www.chatbase.co/dashboard/) and select the agent connected to your Shopify store. Click **Actions** at the top of the page.
Click **Create Action** and choose **Shopify get cart**.
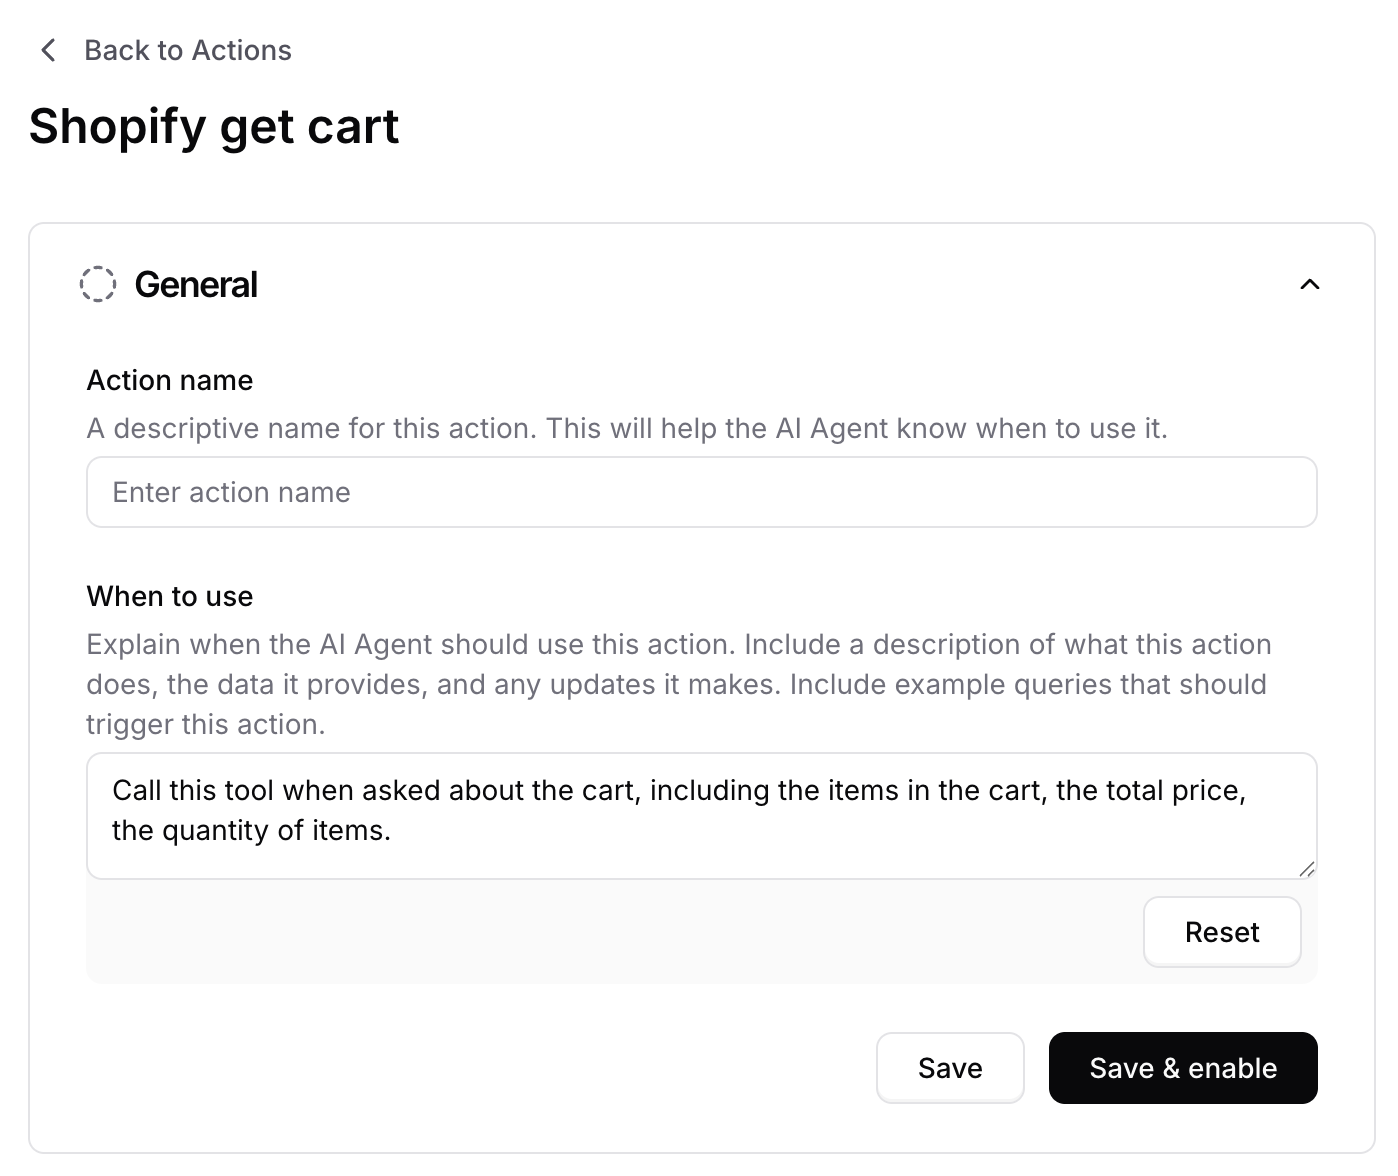
Both fields come pre-filled with working defaults. Leave them as-is unless you need to make a specific change.
**Action Name:** Get\_Cart.
**When to use:** Call this tool when asked about the cart, including the items in the cart, the total price, the quantity of items.
**This action cannot be tested in the Action Preview on the dashboard, as it requires the user to be authenticated in order to work properly.**
**Guest customers can look up orders using either:**
* Checkout email + order number
* Phone number + order number
**For authenticated customers, order lookup is automatic**, no email address, phone number, or order number is required. Orders are retrieved directly from the signed-in account.
***
### 3. Get Cart
Display the current contents of a customer's shopping cart, including items, quantities, prices, and totals.
Showing customers what's in their cart, displaying cart totals, and helping customers review items before checkout.
**Common Use Cases:**
* "What's in my cart?"
* "Show me my cart total"
* "How many items are in my cart?"
* "What did I add to my cart?"
**Note:** Retrieving the cart only works when the app is embedded in your Shopify store. It will not work in the Playground.
#### Setup Instructions
Go to your [Chatbase dashboard](https://www.chatbase.co/dashboard/) and select the agent connected to your Shopify store. Click **Actions** at the top of the page.
Click **Create Action** and choose **Shopify get cart**.
Both fields come pre-filled with working defaults. Leave them as-is unless you need to make a specific change.
**Action Name:** Get\_Cart.
**When to use:** Call this tool when asked about the cart, including the items in the cart, the total price, the quantity of items.
 Click **Save** and ensure the action is toggled to **Enabled**.
Test the action by asking your agent to show cart contents.
Click **Save** and ensure the action is toggled to **Enabled**.
Test the action by asking your agent to show cart contents.
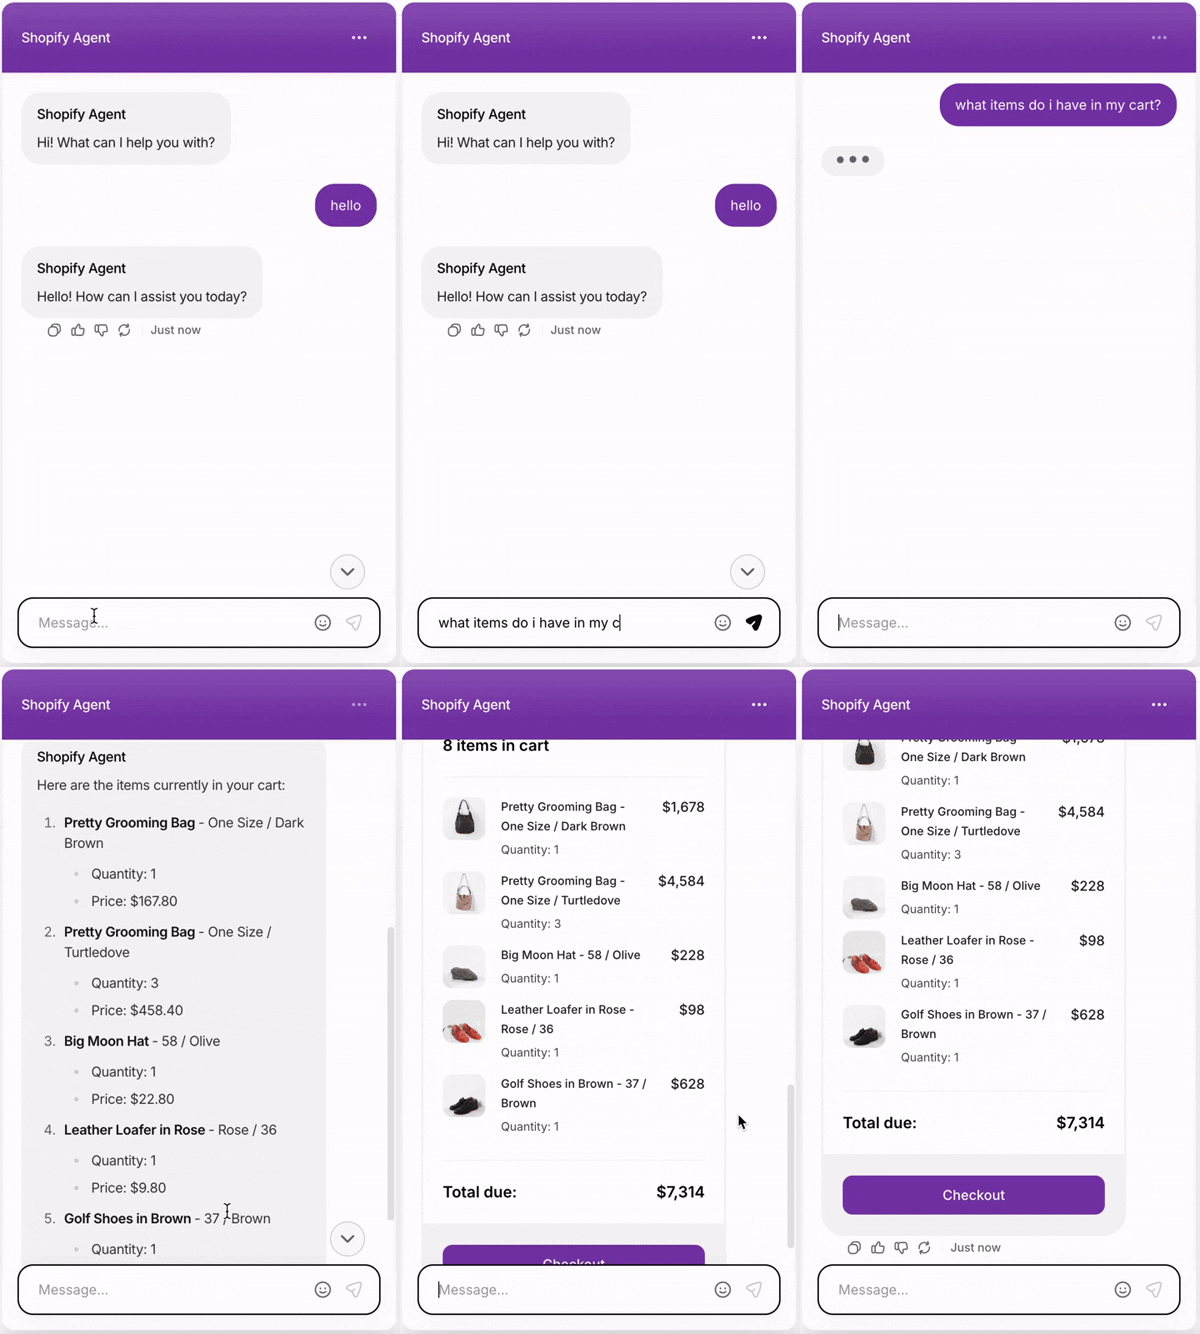 **This action cannot be tested in the Action Preview on the dashboard, as it requires the user to be authenticated in order to work properly.**
***
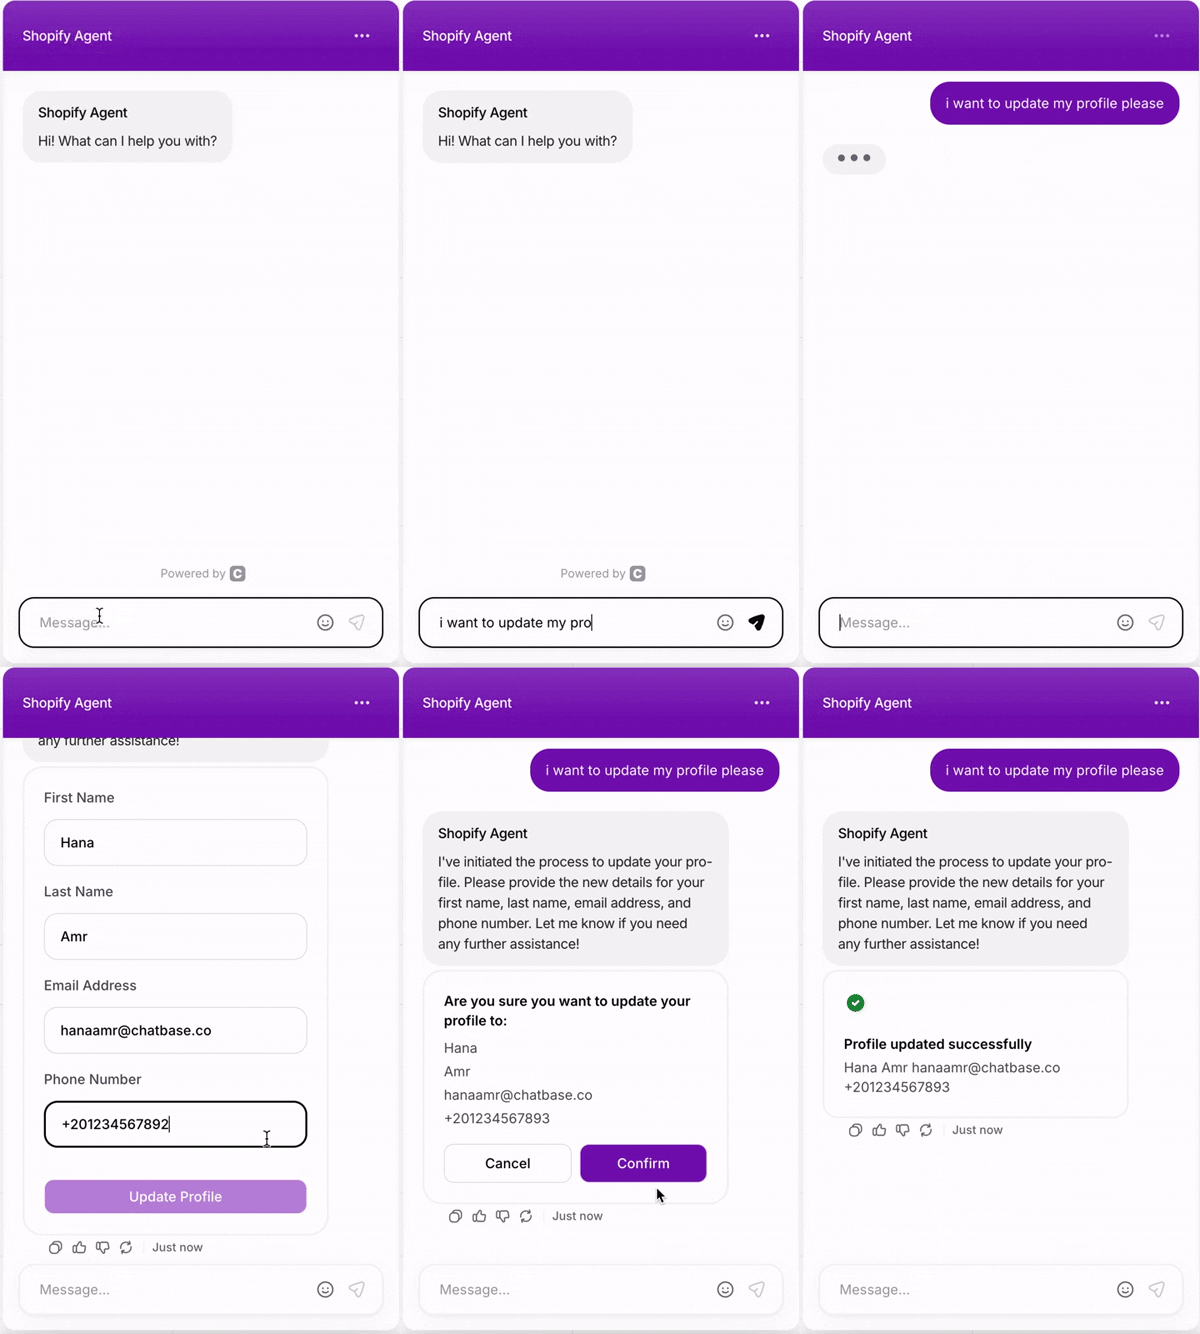
### 4. Update Profile
Enable signed-in customers to modify their account profile information through the agent.
Account management, updating contact information, and helping customers keep their profile current.
**Common Use Cases:**
* "Update my email address"
* "Change my phone number"
* "Update my account information"
#### Setup Instructions
Go to your [Chatbase dashboard](https://www.chatbase.co/dashboard/) and select the agent connected to your Shopify store. Click **Actions** at the top of the page.
Click **Create Action** and choose **Update shopify customer profile**.
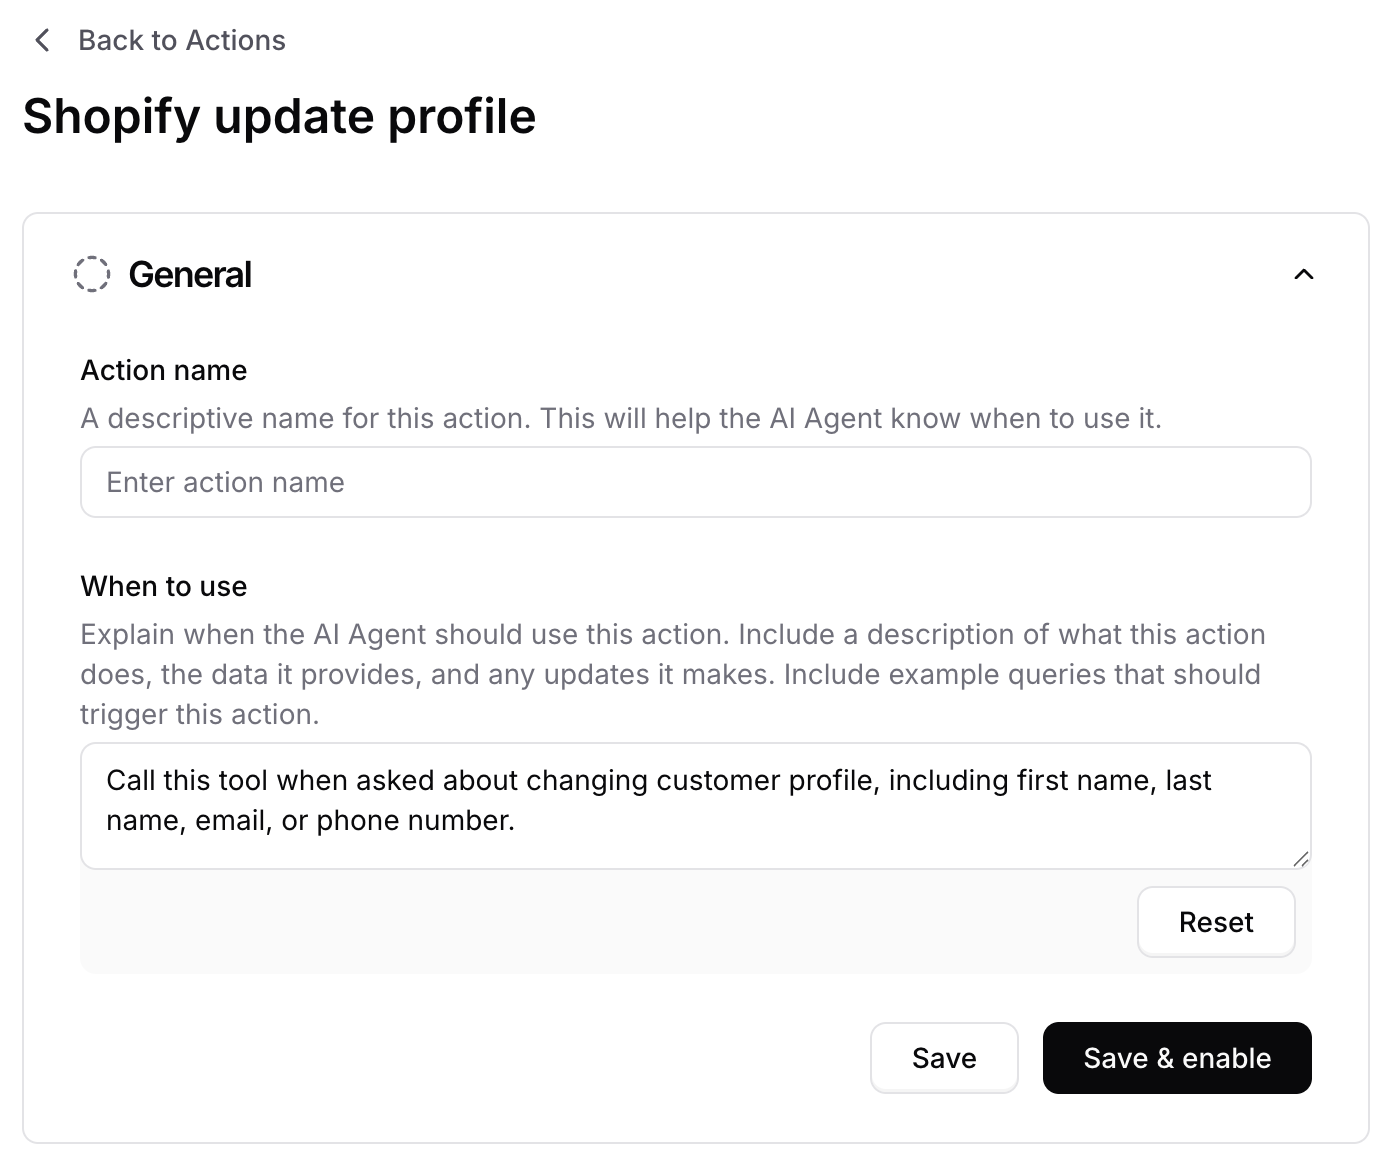
Both fields come pre-filled with working defaults. Leave them as-is unless you need to make a specific change.
**Action Name:** Update\_Profile.
**When to use:** Call this tool when asked about changing customer profile, including first name, last name, email, or phone number.
**This action cannot be tested in the Action Preview on the dashboard, as it requires the user to be authenticated in order to work properly.**
***
### 4. Update Profile
Enable signed-in customers to modify their account profile information through the agent.
Account management, updating contact information, and helping customers keep their profile current.
**Common Use Cases:**
* "Update my email address"
* "Change my phone number"
* "Update my account information"
#### Setup Instructions
Go to your [Chatbase dashboard](https://www.chatbase.co/dashboard/) and select the agent connected to your Shopify store. Click **Actions** at the top of the page.
Click **Create Action** and choose **Update shopify customer profile**.
Both fields come pre-filled with working defaults. Leave them as-is unless you need to make a specific change.
**Action Name:** Update\_Profile.
**When to use:** Call this tool when asked about changing customer profile, including first name, last name, email, or phone number.
 Click **Save** and ensure the action is toggled to **Enabled**.
Test the action by asking your agent to update profile information.
Click **Save** and ensure the action is toggled to **Enabled**.
Test the action by asking your agent to update profile information.
 **This action cannot be tested in the Action Preview on the dashboard, as it requires the user to be authenticated in order to work properly.**
***
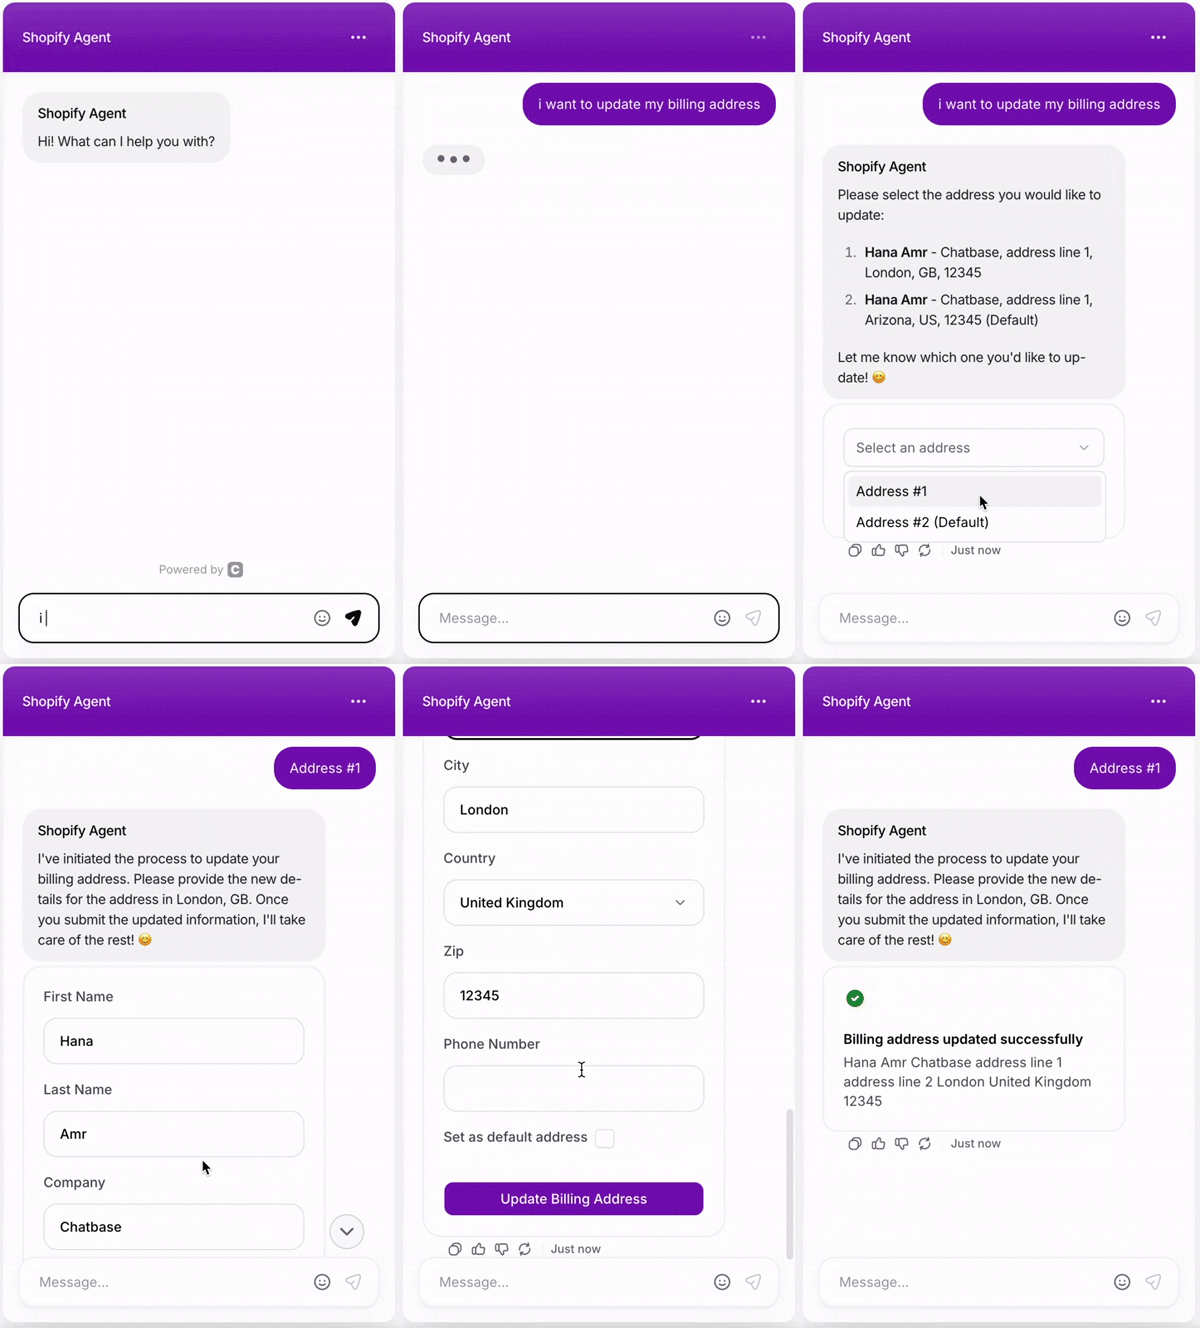
### 5. Update Billing Address
Allow customers to add new billing addresses or update existing ones directly through the chat interface.
Self-service address updates, helping customers correct billing information, and streamlining account management.
**Common Use Cases:**
* "Update my billing address"
* "Change my payment address"
* "I moved and need to update my address"
* "I want to add a new address and set it as default"
#### Setup Instructions
Go to your [Chatbase dashboard](https://www.chatbase.co/dashboard/) and select the agent connected to your Shopify store. Click **Actions** at the top of the page.
Click **Create Action** and choose **Update shopify customer billing address**.
Both fields come pre-filled with working defaults. Leave them as-is unless you need to make a specific change.
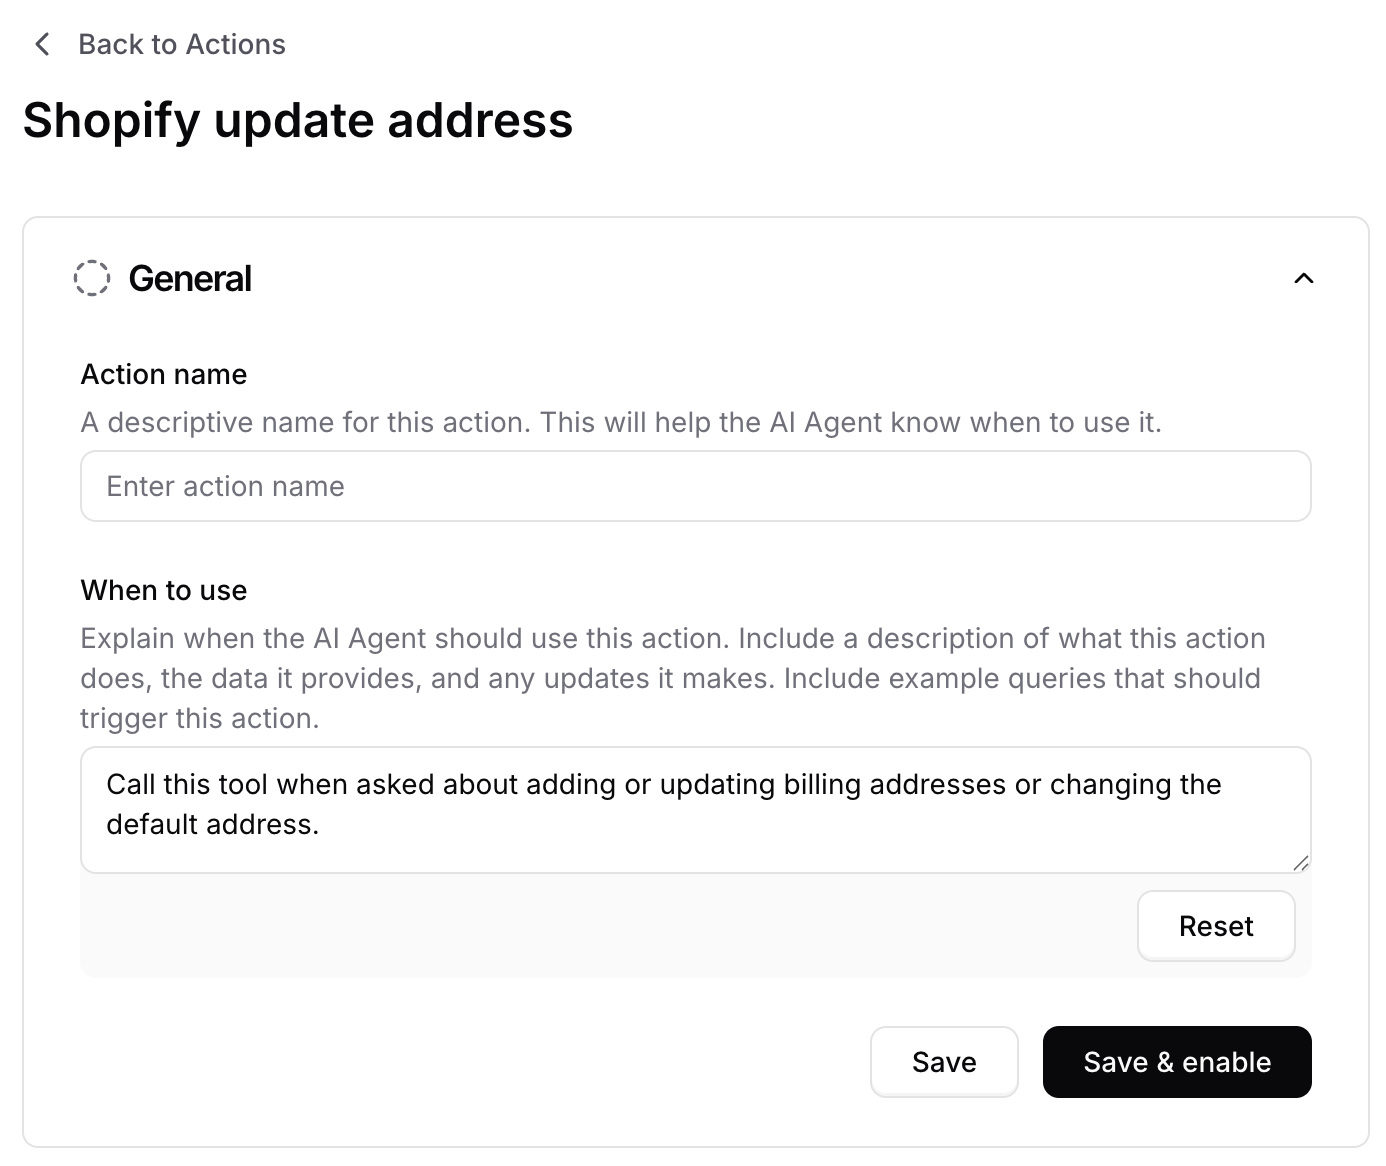
**Action Name:** Update\_Address.
**When to use:** Call this tool when asked about adding or updating billing addresses or changing the default address.
**This action cannot be tested in the Action Preview on the dashboard, as it requires the user to be authenticated in order to work properly.**
***
### 5. Update Billing Address
Allow customers to add new billing addresses or update existing ones directly through the chat interface.
Self-service address updates, helping customers correct billing information, and streamlining account management.
**Common Use Cases:**
* "Update my billing address"
* "Change my payment address"
* "I moved and need to update my address"
* "I want to add a new address and set it as default"
#### Setup Instructions
Go to your [Chatbase dashboard](https://www.chatbase.co/dashboard/) and select the agent connected to your Shopify store. Click **Actions** at the top of the page.
Click **Create Action** and choose **Update shopify customer billing address**.
Both fields come pre-filled with working defaults. Leave them as-is unless you need to make a specific change.
**Action Name:** Update\_Address.
**When to use:** Call this tool when asked about adding or updating billing addresses or changing the default address.
 Click **Save** and ensure the action is toggled to **Enabled**.
Test the action by asking your agent to update a billing address.
Click **Save** and ensure the action is toggled to **Enabled**.
Test the action by asking your agent to update a billing address.
 **This action cannot be tested in the Action Preview on the dashboard, as it requires the user to be authenticated in order to work properly.**
***
## Best Practices
Write specific "When to use" descriptions to help the AI agent accurately determine when to trigger each action. Include example phrases customers might use.
Test each action with various customer queries before going live. Verify that product searches return accurate results and order lookups display correct information.
Monitor your product sync status regularly. If you notice discrepancies, you can manually trigger a resync from the action settings.
Enable multiple actions together to provide a complete shopping experience. Customers often need to search products, check their cart, and track orders in the same conversation.
**This action cannot be tested in the Action Preview on the dashboard, as it requires the user to be authenticated in order to work properly.**
***
## Best Practices
Write specific "When to use" descriptions to help the AI agent accurately determine when to trigger each action. Include example phrases customers might use.
Test each action with various customer queries before going live. Verify that product searches return accurate results and order lookups display correct information.
Monitor your product sync status regularly. If you notice discrepancies, you can manually trigger a resync from the action settings.
Enable multiple actions together to provide a complete shopping experience. Customers often need to search products, check their cart, and track orders in the same conversation.